- What are the Common Causes of the S.M.A.R.T. Error «Erase Fail Count» 0xB6?
- Stop Using The Faulty HDD
- Restore The Deleted Data From The Disk
- Scan The Disk For Bad Sectors
- Reduce The Disk Temperature
- Run Hard Disk Defragmentation
- «0xB6» In an SSD
- How Can You Reset "0xB6 Erase Fail Count"?
- Buy a New Hard Disk
- Hard Drives and SSD
Read more how to fix «0xB6 Erase Fail Count» in Windows 11, Windows 10, Windows 8.1, Windows Server 2012, Windows 8, Windows Home Server 2011, Windows 7 (Seven), Windows Small Business Server, Windows Server 2008, Windows Home Server, Windows Vista, Windows XP, Windows 2000, Windows NT.
What are the Common Causes of the S.M.A.R.T. Error «Erase Fail Count» 0xB6?
There are several common causes of the S.M.A.R.T. Error «Erase Fail Count» 0xB6, including:
- Physical damage to the hard drive: Physical damage to the hard drive, such as a head crash or bad sectors, can cause the «Erase Fail Count» to increase.
- Firmware issues: Firmware issues on the hard drive can cause errors in the erasing process, leading to an increase in the «Erase Fail Count».
- Power surges or electrical issues: Power surges or other electrical issues can disrupt the erasing process on the hard drive, resulting in errors and an increase in the «Erase Fail Count».
- Overheating: Overheating of the hard drive can cause errors in the erasing process, leading to an increase in the «Erase Fail Count».
- Software errors: Software errors or bugs in the operating system or disk management software can also cause errors in the erasing process, resulting in an increase in the «Erase Fail Count».
- Age and wear: Over time, hard drives can wear out and develop errors in the erasing process, leading to an increase in the «Erase Fail Count».
Stop Using The Faulty HDD
If you receive a system message about an error diagnosed, it doesn’t mean the disk is out of order already. However, in case of a S.M.A.R.T. error, you should realize the disk is on the way to its breakdown. It can fail completely anytime – both within several minutes or in a month or even in a year. Anyway, it does mean you cannot trust to keep your data there.
You should take some care about the safety of your data, make a backup copy or transfer files to another media. Along with these actions meant to save your data, you should also replace your hard disk. The disk where S.M.A.R.T. errors were found cannot be used – even if it doesn’t break down completely, it can still damage your data partially.
Of course, a hard disk can fail even without showing any S.M.A.R.T. messages, but this technology gives you a certain advantage of warning you about the coming breakdown problem.
Restore The Deleted Data From The Disk
If there is a SMART error, restoring data from the disk is not always necessary. In case of an error, it is recommended to create a backup copy of important information immediately, because now the disk can fail completely at any time. However, there are errors that make data copying impossible. In this case, you can use special hard disk data recovery software - Hetman Partition Recovery.

To do it:
Download the program, install and launch it.
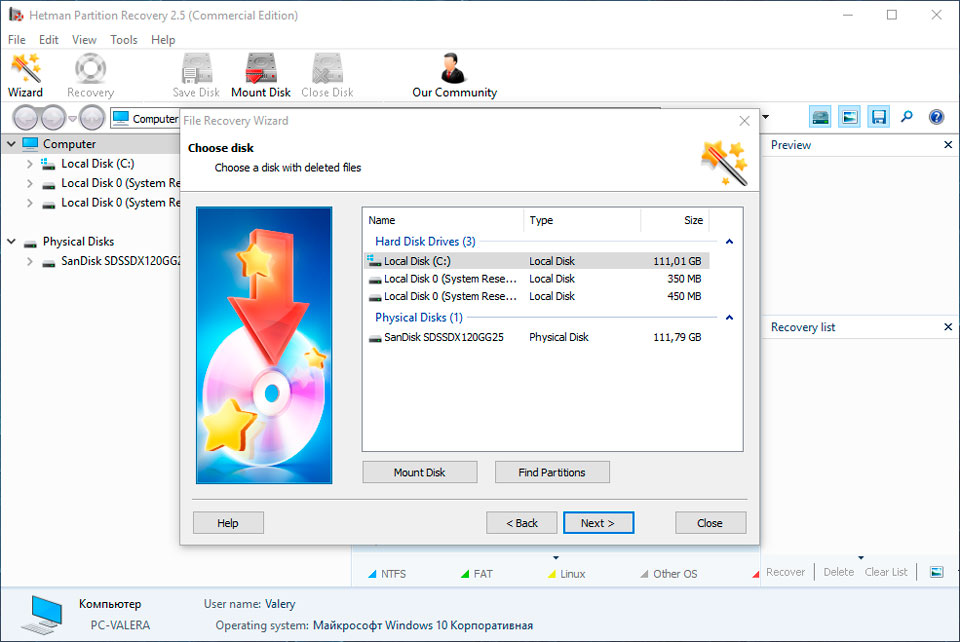
By default, you will be suggested to use File Recovery Wizard. After clicking Next the program will suggest you to choose a disk to recover files from.
Double-click on the faulty disk and choose the type of analysis. Select Full analysis and wait for the scanning process to finish.
After the scanning process is over you will be shown files for recovery. Select the necessary files and click Recover.
Select one of the suggested ways to save files. Do not save the recovered files to the disk having an error «0xB6 Erase Fail Count».
Scan The Disk For Bad Sectors
Start scanning all partitions of the disk and try correcting any mistakes that are found.
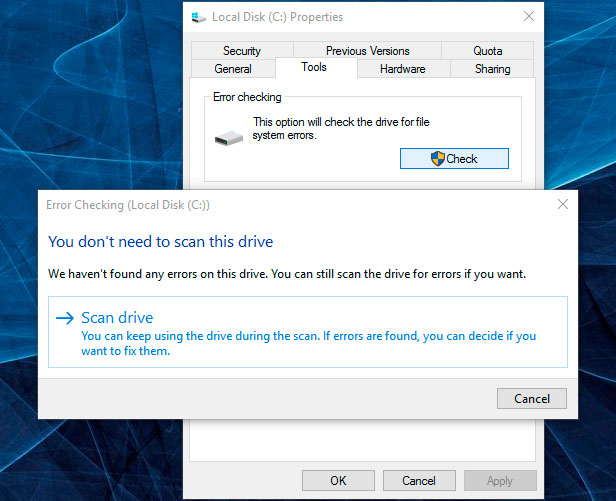
To do it, open This PC and right-click on the disk with a SMART error.
Select Properties / Tools / Check in the tab Error checking.

Errors found on the disk as a result of scanning can be corrected.

How to Check Your Hard Disk for Errors and Fix Them in Windows 10
Reduce The Disk Temperature
Sometimes a SMART error can be caused by exceeding the maximum temperature of the disk. This problem can be eliminated by improving the case ventilation. First of all, make sure that your computer has sufficient ventilation and that all coolers are in proper working order.
If you found and eliminated the ventilation problem, which helped to bring the disk temperature back to normal, this SMART error can never appear again.

How to Check the Processor (CPU), Video Card (GPU) or Hard Disk (HDD) Temperature
Run Hard Disk Defragmentation
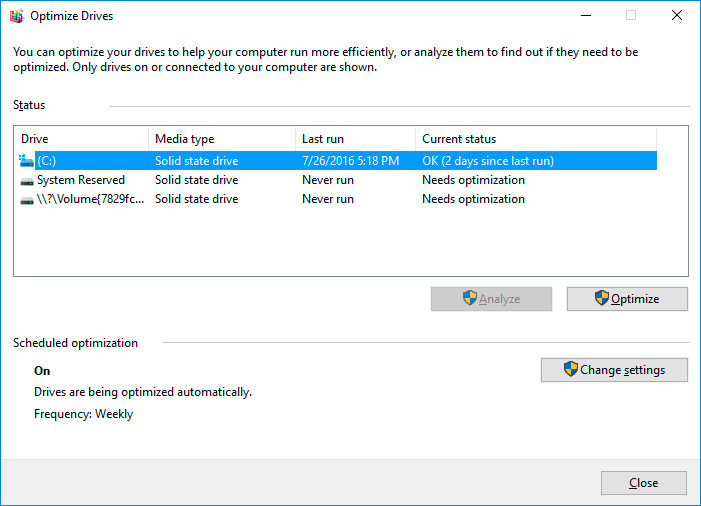
Open This PC and right-click on the disk having an error «0xB6 Erase Fail Count». Select Properties / Tools / Optimize in the tab Optimize and defragment drive.

How to Defragment Your PC's Hard Drive on Windows 10

Select the disk you need to optimize and click Optimize.
Note. In Windows 10 disk defragmentation and optimization can be adjusted to take place automatically.
«Erase Fail Count» In an SSD
Even if you have no problems with an SSD performance, its operability is reducing slowly because SSD memory cells have a limited number of overwrite cycles. The wear resistance function minimizes this effect but never takes it away completely.
SSD disks have their specific SMART attributes which send signals about the state of disk memory cells. For example, "209 Remaining Drive Life," "231 SSD life left" etc. Such errors may occur when memory cell operability is reduced, and it means the information kept there can be damaged or lost.
In case of failure, SSD cells cannot be recovered or replaced.

SSD Diagnostics: Programs to Find and Fix SSD Errors
How Can You Reset «0xB6 Erase Fail Count»?
SMART errors can be easily reset in BIOS (or UEFI) but all OS developers strongly discourage users from this step. Yet if the data on the hard disk is of little importance for you, displaying SMART errors can be disabled.
Here is the procedure to follow:
Restart the computer, and use combinations of keys shown on the loading screen (they depend on a specific manufacturer, usually "F2" or "Del") to go to BIOS (or UEFI).
Go to Аdvanced > SMART settings > SMART self test. Set the value as Disabled.
Note: The place where you disable the function is given approximately, because its specific location depends on the version of BIOS or UEFI and can differ slightly.
Buy a New Hard Disk
Is It Worth Repairing an HDD?
It is important to realize that any of the ways to eliminate a SMART error is self-deception. It is impossible to completely remove the cause of the error, as it often involves physical wear of the hard disk mechanism.
To replace the hard disk components which operate incorrectly you can go to a service center or a special laboratory dealing with hard disks.
However, the cost of work will be higher than the price of a new device, so it is justified only when you need to restore data from a disk which is no longer operable.
How to choose a new HDD?
If you encounter a hard disk SMART error, then buying a new HDD is only a matter of time. The disk type you need depends on how you work on the computer and the purposes you use your computer for.
Here are some points to consider when buying a new hard disk:
Disk type: HDD, SSD или SSHD. Each type has its advantages and disadvantages which may be unimportant for one user and crucial for another. These are read and write speed, capacity and tolerance to multiple overwriting.
Size. There are two main form factors for hard disks, 3.5 inch and 2.5 inch. The size of disks is determined in accordance to the slot in a particular computer or laptop.
Interface. The main interfaces of hard disks are as follows:
SATA;
IDE, ATAPI, ATA;
SCSI;
External Disk (USB, FireWire etc).
Technical characteristics and performance:
Capacity;
Read and write speed;
Memory cache size;
Response time;
Fail safety.
S.M.A.R.T. Availability of this technology in the disk will help determining possible mistakes in its work and prevent loss of data before it is too late.
Package. This item can include interface or power cables as well as warranty and service options.
Hard drives and SSD
WD HDD
- WD Blue
- WD Green
- WD Black
- WD Red
- WD Purple
- WD Gold
Seagate HDD
- BarraCuda
- FireCuda
- Backup/Expansion
- Enterprise (NAS)
- IronWolf (NAS)
- SkyHawk
Transcend HDD
- 25M
- 25H
- 25C
- 25A
- 35T
Hitachi HDD
- Travelstar
- Deskstar (NAS)
- Ultrastar
HP HDD
- MSA SAS
- Server SATA
- Server SAS
- Midline SATA
- Midline SAS
IBM HDD
- V3700
- Near Line
- Express 2.5
- V3700 2.5
- Server
- Near Line 2.5
LaCie HDD
- Porsche/Mobile
- Porsche
- Rugged
- d2
A-Data HDD
- DashDrive
- HV
- Durable)
- HD
Silicon Power HDD
- Armor
- Diamond
- Stream
Toshiba HDD
- MG, DT, MQ
- P, X, L
- N, S, V
- DT, AL
Dell HDD
- SAS
- SCI
- Hot-Plug
Verbatim HDD
- Go(external)
- Save
Team Group SSD
- EVO/Lite/GX2 (TLC)
- PD (external)
Silicon Power SSD
- Velox/M/Slim
- Ace (3D TLC)
Apacer SSD
- M.2
- ProII
- Portable
- Panther
Crucial SSD
- BX
- MX
GOODRAM SSD
- CL (TLC)
- PX (TLC)
- Iridium (MLC/TLC)
Kingston SSD
- Consumer
- HyperX
- Enterprise
- Builder
Patriot SSD
- Flare (MLC)
- Scorch (MLC, M.2)
- Spark (TLC)
- Blast/P (TLC)
- Burst (3D TLC)
- Viper (TLC, M.2)
Samsung SSD
- PRO (3D MLC)
- EVO
- QVO (3D QLC)
- Portable
- DCT
- PM
Seagate SSD
- Nytro
- Maxtor
- FireCuda
- BarraCuda
- Expansion
- IronWolf
A-Data SSD
- Premier (MLC/TLC)
- Ultimate (3D NAND)
- XPG
- SC (external)
- SE (external)
- Durable
WD SSD
- WD Blue
- WD Green
- WD Black
- WD Red
- WD Purple
- WD Gold
Transcend SSD
- SSDXXX
- PATA
- MTSXXX
- MSAXXX
- ESDXXX


