- Why Regular Data Recovery Tools Can’t Restore Files from RAID
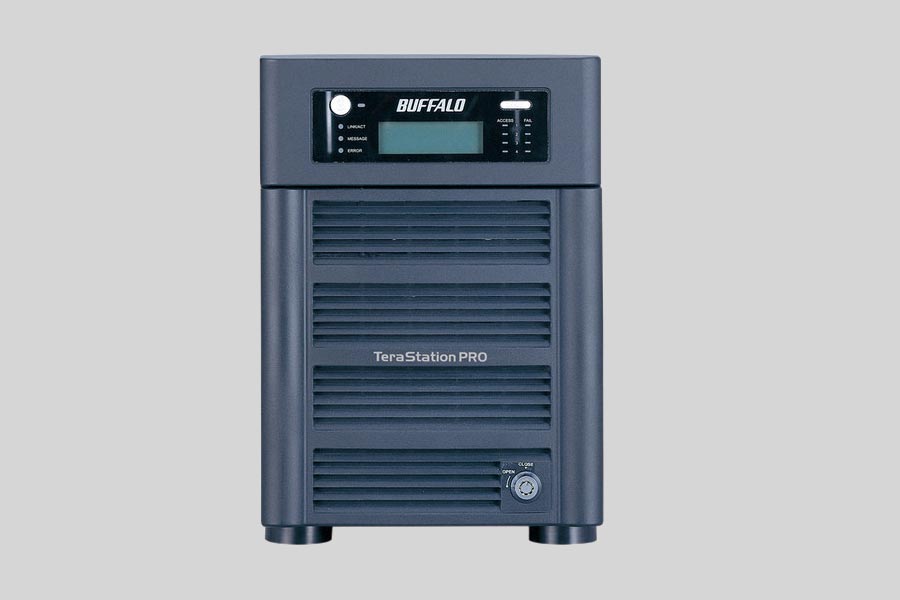
- Key Information About the NAS Buffalo TeraStation TS-H4.0TGL/R5
- How to Remove Hard Disks from Your NAS and Connect Them to a PC
Why Regular Data Recovery Tools Can’t Restore Files from RAID
Conventional hard drives store user data by writing it sequentially across the disk surface, which means an entire file is typically located on a single drive. In contrast, when data is written to a RAID array, each file is split into multiple fragments. These fragments are then distributed and written in sequence across all the drives in the array. Depending on the configuration, fragment sizes can range from 2 KB to 2 MB, so every file is physically stored across several disks at once.
This approach significantly increases read and write performance — after all, writing two halves of a 1 GB file to two drives simultaneously is much faster than writing the full 1 GB to a single disk. However, this same mechanism makes file recovery far more complex.
Different RAID levels use different methods to distribute and protect data. On top of that, manufacturers like Buffalo often add their own proprietary structures and variations. As a result, data can be written to disks in many different formats, and each requires a specific approach during recovery.
How can RAID (Redundant Array of Independent Disks) configurations impact data loss in NAS Buffalo TeraStation TS-H4.0TGL/R5 devices?
RAID configurations in NAS Buffalo TeraStation TS-H4.0TGL/R5 devices can have a significant impact on data loss prevention. Here are some ways RAID configurations can affect data loss:
- Redundancy: RAID configurations, such as RAID 1, RAID 5, or RAID 6, provide redundancy by storing data across multiple disks. This redundancy ensures that if one disk fails, the data can still be accessed from the remaining disks. This helps to prevent data loss in case of disk failures.
- Fault tolerance: RAID configurations with parity, such as RAID 5 or RAID 6, can tolerate the failure of one or more disks without losing data. Parity information is distributed across the disks, allowing for data reconstruction even if a disk fails. This fault tolerance helps to minimize the risk of data loss.
- Hot spare: Some RAID configurations, like RAID 5 or RAID 6, support the use of a hot spare disk. A hot spare is an extra disk that remains idle until a disk failure occurs. When a disk fails, the hot spare automatically takes its place, reducing the downtime and minimizing the risk of data loss.
- Rebuild process: In the event of a disk failure, RAID configurations initiate a rebuild process to reconstruct the lost data using parity information or data redundancy. This process automatically occurs in the background, ensuring that the system remains operational and minimizing the risk of data loss.
However, it's important to note that RAID configurations do not provide complete protection against all types of data loss. They primarily protect against disk failures but cannot prevent data loss due to other factors like accidental deletion, file corruption, or multiple disk failures within a short time frame.
To ensure comprehensive data protection, it is recommended to combine RAID configurations with regular backups to separate storage devices or cloud services. This way, even if a catastrophic event occurs, such as a fire or theft, the data can still be recovered from the backups.
How to Remove Hard Disks from Your NAS and Connect Them to a PC
Although the NAS TeraStation TS-H4.0TGL/R5 can be accessed over the network, you still need to remove its hard disks and connect them directly to a Windows PC. Only then can the recovery software properly scan and analyze the drives. Follow these steps:
-
Power off the NAS and disconnect it from the power source.
WARNING! Before removing any drives, carefully read the device manual. Improper actions may damage both the NAS enclosure and the hard disks in the RAID array.
-
Remove the hard disks one by one, gently sliding each drive out of its slot. Remember that hard disks are highly sensitive: any impact or drop can cause serious physical damage.
-
Label each hard disk according to its position inside the NAS. The order of the drives is crucial for correct RAID reconstruction.
-
Connect the drives to your computer. In this video, we explain which ports you can use to connect hard disks and what to do if your PC does not have enough free connectors.
Go to view
Step-by-Step Data Recovery with Hetman RAID Recovery

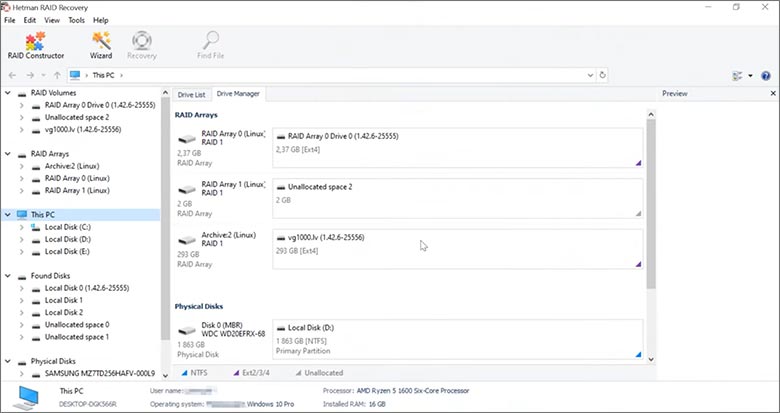
This program restores data from damaged RAID arrays and is fully compatible with Buffalo TeraStation TS-H4.0TGL/R5. Each hard disk in the array contains technical metadata describing how files were written. When launched, Hetman RAID Recovery analyzes this metadata, automatically reconstructs the damaged array, and provides access to its contents. After that, you can browse the recovered disk and save your files. The program can also restore files that were accidentally deleted from the network drive.

How to recover data from a Buffalo
TeraStation TS-H4.0TGL/R5 has 4 HDD slots, and it supports the following array types:
- RAID 0;
- RAID 1;
- RAID 5;
- RAID 6;
- JBOD;
NAS supports:
- exFAT, VFAT, FAT 12 / 16 / 32;
- NTFS / ReFS;
- APFS / HFS+;
- Ext2 / 3 / 4 / ReiserFS / XFS / UFS / ZFS / Btrfs;
- VMFS / HikvisionFS;
How to Safely Recover Data from Disk Images
This utility allows you to create a complete copy of a disk and work with the disk image instead of the physical drive. This approach helps protect your data from:
- Overwriting during the recovery process;
- Additional data loss caused by bad sectors;
- User errors.
To create a disk image, follow these steps:
-
Ensure you have enough free space to store the image. Its size will typically match the size of the original disk.
-
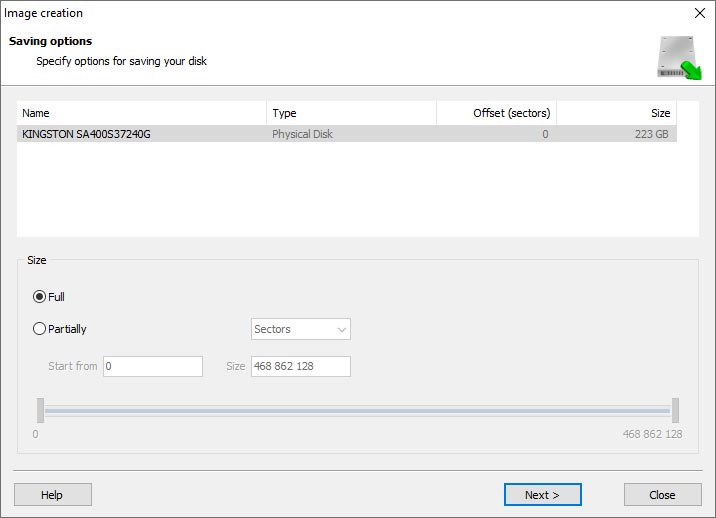
In the main window, select the target disk and choose Tools - Save Disk. You can also select multiple disks if needed.
-
When the Image Creation Wizard opens, select whether you want to save the entire disk or only a specific region. Adjust the settings and click Next.

-
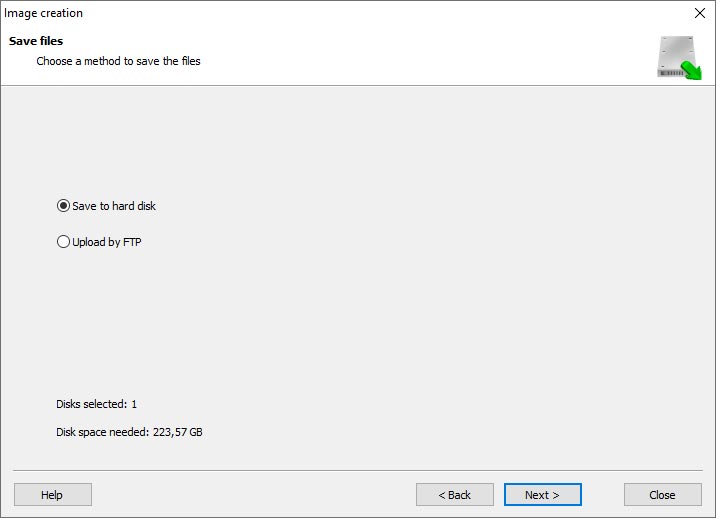
Choose the directory where the image will be saved. You may select any available disk connected to your PC or upload the image via FTP.

Where Are the User’s Files Actually Stored?
The Buffalo TeraStation TS-H4.0TGL/R5 network-attached storage keeps OS Linux operating system files on a separate RAID 1 (mirrored) array. Usually, all NAS systems create several volumes on every hard disk, and the first of them takes up to 2 Gb of space. This is where operating system files are stored. Other volumes are united into a RAID array where user’s data is written.
RAID Recovery Software: Detailed Comparison
| Product | Operating system | RAID controller support | Supported file systems | Virtual RAID controller support | Data recovery from damaged RAID | File preview |
|---|---|---|---|---|---|---|
| Hetman RAID Recovery | Windows, Linux, MacOS | Yes, over 100 controllers | FAT, exFAT, NTFS, ReFS, APFS, HFS+, Ext4, Ext3, Ext2, ReiserFS, Btrfs, VMFS, Hikvision, XFS, UFS, ZFS | Yes | Yes | Yes |
| DiskInternals RAID Recovery | Windows | Yes, over 10 controllers | FAT, NTFS, Ext2/3/4, HFS+ | No | Yes | Yes |
| R-Studio | Windows, Mac, Linux | Yes, over 20 controllers | FAT, NTFS, Ext2/3/4, HFS+ | Yes | Yes | Yes |
| UFS Explorer RAID Recovery | Windows, Mac, Linux | Yes, over 100 controllers | FAT, NTFS, Ext2/3/4, HFS+ | Yes | Yes | Yes |
| EaseUS Data Recovery | Windows | Yes, over 20 controllers | FAT, NTFS, Ext2/3/4, HFS+ | No | Yes | Yes |
| ReclaiMe Free RAID Recovery | Windows | Yes, over 100 controllers | FAT, NTFS, Ext2/3/4, HFS+ | Yes | Yes | Yes |


Yes, it is possible to recover data from a NAS Buffalo TeraStation TS-H4.0TGL/R5 device that has been affected by a controller failure or disk array problem. However, the process of data recovery can be complex and may require professional assistance from a data recovery service.
In such cases, the first step is to diagnose the exact cause of the problem, whether it is a controller failure or a disk array issue. This can be done by troubleshooting the device or consulting with a data recovery specialist.
Once the cause is determined, appropriate steps can be taken to recover the data. This may involve repairing or replacing the failed controller, rebuilding the disk array, or extracting the data directly from the disks using specialized equipment.
It is important to note that attempting to recover data from a failed NAS device without proper knowledge and expertise can lead to further data loss or permanent damage. Therefore, it is recommended to seek professional help from a reputable data recovery service in such situations.