- Why Regular Data Recovery Tools Can’t Restore Files from RAID
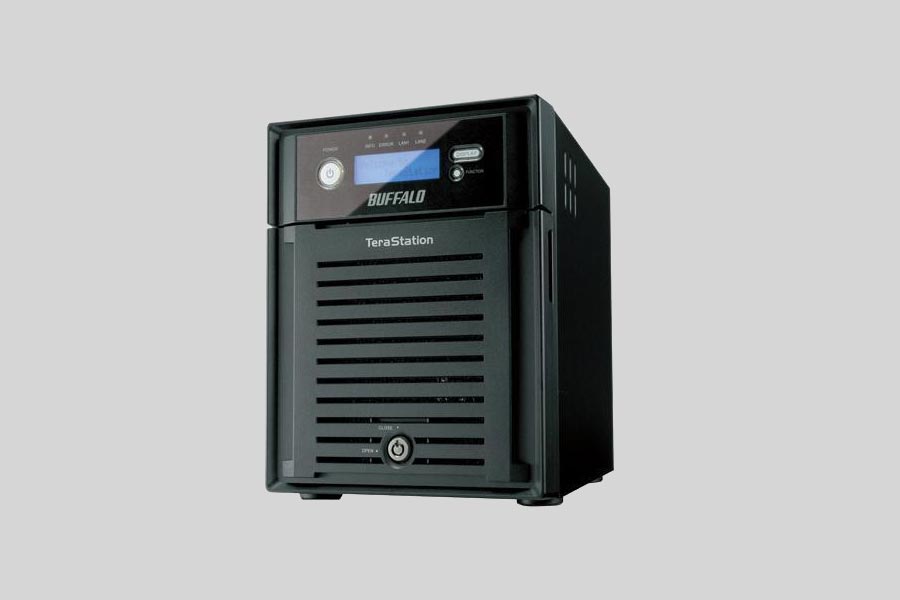
- Key Information About the NAS Buffalo TeraStation TS-QVH8.0TL/R6
- How to Remove Hard Disks from Your NAS and Connect Them to a PC
Why Regular Data Recovery Tools Can’t Restore Files from RAID
Conventional hard drives store user data by writing it sequentially across the disk surface, which means an entire file is typically located on a single drive. In contrast, when data is written to a RAID array, each file is split into multiple fragments. These fragments are then distributed and written in sequence across all the drives in the array. Depending on the configuration, fragment sizes can range from 2 KB to 2 MB, so every file is physically stored across several disks at once.
This approach significantly increases read and write performance — after all, writing two halves of a 1 GB file to two drives simultaneously is much faster than writing the full 1 GB to a single disk. However, this same mechanism makes file recovery far more complex.
Different RAID levels use different methods to distribute and protect data. On top of that, manufacturers like Buffalo often add their own proprietary structures and variations. As a result, data can be written to disks in many different formats, and each requires a specific approach during recovery.
How can regular system monitoring and alerting help in early detection and prevention of data loss events on NAS Buffalo TeraStation TS-QVH8.0TL/R6 devices?
Regular system monitoring and alerting can play a crucial role in the early detection and prevention of data loss events on NAS Buffalo TeraStation TS-QVH8.0TL/R6 devices. Here are some ways it can help:
- Disk Health Monitoring: By monitoring the health of the hard drives in the TeraStation, you can identify any signs of impending failure or degradation. This includes monitoring parameters such as SMART attributes, temperature, and disk usage. If any abnormalities are detected, you can take proactive measures like replacing the failing drive before it leads to data loss.
- RAID Array Monitoring: The TeraStation TS-QVH8.0TL/R6 supports various RAID levels for data redundancy and protection. Regular monitoring of the RAID array ensures that it is functioning properly and all drives are in sync. Monitoring tools can alert you if any drive fails or if there are any issues with the RAID configuration, allowing you to take immediate action to prevent data loss.
- Network Monitoring: Monitoring the network connectivity and performance of the TeraStation can help detect any issues that may impact data availability or integrity. This includes monitoring network bandwidth, latency, and packet loss. If there are any network-related problems, you can address them promptly to prevent data loss or corruption.
- File System Monitoring: Monitoring the file system on the TeraStation can help identify any anomalies or errors that may lead to data loss. This includes monitoring file system integrity, file permissions, and file access logs. Any unauthorized modifications or suspicious activities can trigger alerts, enabling you to investigate and prevent potential data loss events.
- Backup Monitoring: If you have implemented a backup strategy for your TeraStation, monitoring the backup process ensures that your data is being successfully backed up. Regularly verifying the integrity of backups and monitoring backup completion status can help you identify any issues that may compromise data recovery in case of a data loss event.
- Security Monitoring: Monitoring security events and access logs on the TeraStation can help detect any unauthorized access attempts or potential security breaches. By setting up alerts for suspicious activities or failed login attempts, you can take immediate action to prevent data loss due to unauthorized access or malware attacks.
In summary, regular system monitoring and alerting provide proactive visibility into the health, performance, and security of your TeraStation NAS device. By promptly detecting and addressing any issues, you can significantly reduce the risk of data loss events and ensure the availability and integrity of your data.
How to Remove Hard Disks from Your NAS and Connect Them to a PC
Although the NAS TeraStation TS-QVH8.0TL/R6 can be accessed over the network, you still need to remove its hard disks and connect them directly to a Windows PC. Only then can the recovery software properly scan and analyze the drives. Follow these steps:
-
Power off the NAS and disconnect it from the power source.
WARNING! Before removing any drives, carefully read the device manual. Improper actions may damage both the NAS enclosure and the hard disks in the RAID array.
-
Remove the hard disks one by one, gently sliding each drive out of its slot. Remember that hard disks are highly sensitive: any impact or drop can cause serious physical damage.
-
Label each hard disk according to its position inside the NAS. The order of the drives is crucial for correct RAID reconstruction.
-
Connect the drives to your computer. In this video, we explain which ports you can use to connect hard disks and what to do if your PC does not have enough free connectors.
Go to view
Step-by-Step Data Recovery with Hetman RAID Recovery

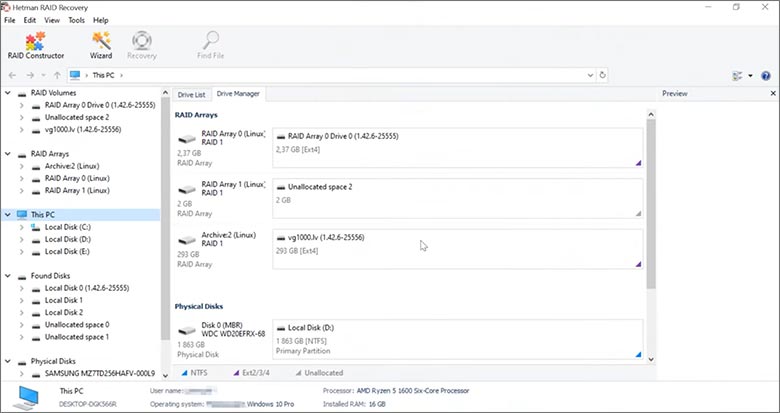
This program restores data from damaged RAID arrays and is fully compatible with Buffalo TeraStation TS-QVH8.0TL/R6. Each hard disk in the array contains technical metadata describing how files were written. When launched, Hetman RAID Recovery analyzes this metadata, automatically reconstructs the damaged array, and provides access to its contents. After that, you can browse the recovered disk and save your files. The program can also restore files that were accidentally deleted from the network drive.

How to recover data from a Buffalo
TeraStation TS-QVH8.0TL/R6 has 4 HDD slots, and it supports the following array types:
- RAID 0;
- RAID 1;
- RAID 5;
- RAID 6;
- JBOD;
NAS supports:
- exFAT, VFAT, FAT 12 / 16 / 32;
- NTFS / ReFS;
- APFS / HFS+;
- Ext2 / 3 / 4 / ReiserFS / XFS / UFS / ZFS / Btrfs;
- VMFS / HikvisionFS;
How to Safely Recover Data from Disk Images
This utility allows you to create a complete copy of a disk and work with the disk image instead of the physical drive. This approach helps protect your data from:
- Overwriting during the recovery process;
- Additional data loss caused by bad sectors;
- User errors.
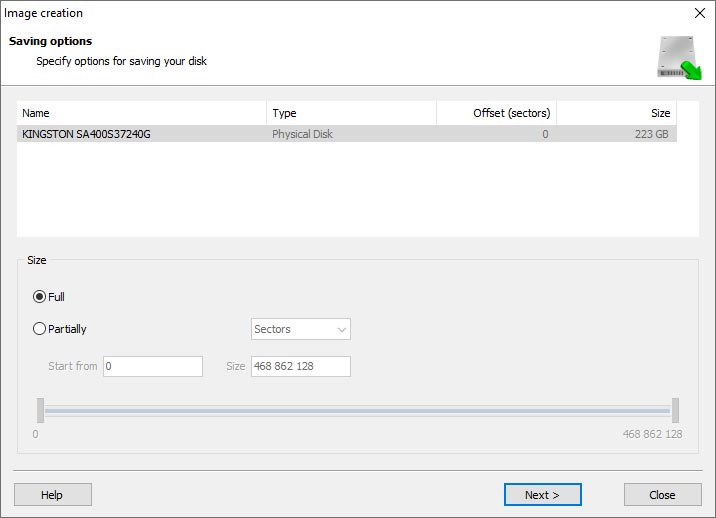
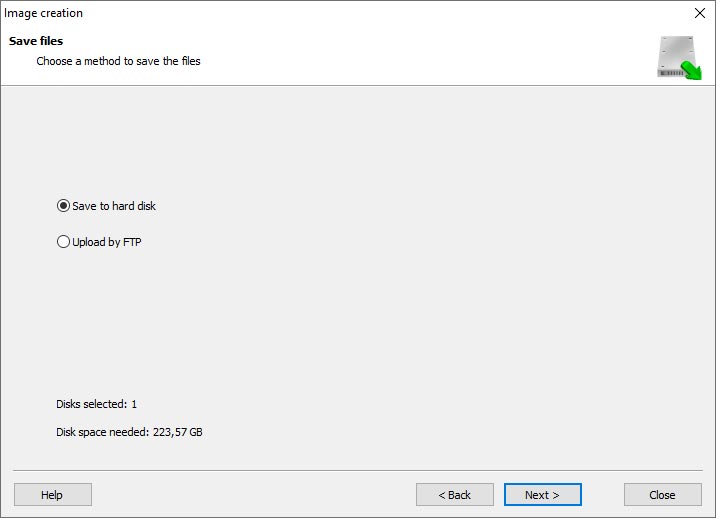
To create a disk image, follow these steps:
-
Ensure you have enough free space to store the image. Its size will typically match the size of the original disk.
-
In the main window, select the target disk and choose Tools - Save Disk. You can also select multiple disks if needed.
-
When the Image Creation Wizard opens, select whether you want to save the entire disk or only a specific region. Adjust the settings and click Next.

-
Choose the directory where the image will be saved. You may select any available disk connected to your PC or upload the image via FTP.

Where Are the User’s Files Actually Stored?
The Buffalo TeraStation TS-QVH8.0TL/R6 network-attached storage keeps OS Linux operating system files on a separate RAID 1 (mirrored) array. Usually, all NAS systems create several volumes on every hard disk, and the first of them takes up to 2 Gb of space. This is where operating system files are stored. Other volumes are united into a RAID array where user’s data is written.
RAID Recovery Software: Detailed Comparison
| Product | Operating system | RAID controller support | Supported file systems | Virtual RAID controller support | Data recovery from damaged RAID | File preview |
|---|---|---|---|---|---|---|
| Hetman RAID Recovery | Windows, Linux, MacOS | Yes, over 100 controllers | FAT, exFAT, NTFS, ReFS, APFS, HFS+, Ext4, Ext3, Ext2, ReiserFS, Btrfs, VMFS, Hikvision, XFS, UFS, ZFS | Yes | Yes | Yes |
| DiskInternals RAID Recovery | Windows | Yes, over 10 controllers | FAT, NTFS, Ext2/3/4, HFS+ | No | Yes | Yes |
| R-Studio | Windows, Mac, Linux | Yes, over 20 controllers | FAT, NTFS, Ext2/3/4, HFS+ | Yes | Yes | Yes |
| UFS Explorer RAID Recovery | Windows, Mac, Linux | Yes, over 100 controllers | FAT, NTFS, Ext2/3/4, HFS+ | Yes | Yes | Yes |
| EaseUS Data Recovery | Windows | Yes, over 20 controllers | FAT, NTFS, Ext2/3/4, HFS+ | No | Yes | Yes |
| ReclaiMe Free RAID Recovery | Windows | Yes, over 100 controllers | FAT, NTFS, Ext2/3/4, HFS+ | Yes | Yes | Yes |


Yes, the order of disks in a NAS Buffalo TeraStation TS-QVH8.0TL/R6 is important for a RAID array. The TeraStation uses a specific RAID configuration, such as RAID 0, RAID 1, RAID 5, or RAID 6, to distribute and store data across multiple disks for redundancy and performance. The order of the disks determines how the data is written and read by the RAID controller. If the disks are not in the correct order, the RAID array may not function properly or data may be inaccessible. It is important to follow the manufacturer's instructions or user manual to ensure the correct disk order for setting up a RAID array in the TeraStation.