Preventing Data Loss on NAS D-Link DNR-312L and Recovering Deleted Files: Insider Tips

Enable versioning and recycle bins on ⭐ NAS to recover deleted files and prevent data loss.

Preventing Data Loss on NAS D-Link DNR-312L and Recovering Deleted Files: Insider Tips

D-Link DNR-312L NAS Data Recovery in 2024

In this step-by-step tutorial, we’ll show you how to rebuild your RAID and recover data from DNR-312L.

Preventing Data Loss on NAS D-Link DNR-312L and Recovering Deleted Files: Insider Tips

RAID Recovery™ 2.6
Recover data from damaged RAID arrays inaccessible from a computer.
Download

Why can’t ordinary software tools restore files from RAID?

Conventional hard disks keep user’s data by writing it to their surface in a consecutive way, and this is how an entire file is stored on a single hard disk. However, when data is written to a RAID system, a file is divided into several parts. Then these parts are written consecutively to all hard disks within such array. The size of such parts may range from 2 KB to 2 MB, so each file is stored on several hard disks at the same time.

Such approach helps to speed up read and write operations, and it is evident that saving two parts of a file having the size of 1 GB to two hard disks simultaneously is much faster than saving the same 1 GB of data to one hard disk. However, this peculiarity makes file recovery more complicated.

Various RAID levels store information in different ways. Additionally, manufacturers like D-Link also introduce some modifications to this process, and that is why data can be written to hard disk in a wide variety of ways.

How can regular data verification or checksum processes help maintain data integrity on NAS D-Link DNR-312L devices?

Regular data verification or checksum processes can help maintain data integrity on NAS D-Link DNR-312L devices in the following ways:

  1. Detecting data corruption: By regularly verifying the integrity of data stored on the NAS device, data corruption issues can be identified. Data verification processes can help identify any inconsistencies or errors in the stored data, ensuring that the data remains intact and unaltered.
  2. Preventing data loss: Regular data verification processes can help prevent data loss by identifying and rectifying any issues before they escalate. By verifying data integrity, potential data loss due to corruption or errors can be detected early, allowing for timely action to be taken to restore or recover the data.
  3. Maintaining data accuracy: Data verification processes, such as checksum calculations, can ensure that the data stored on the NAS device is accurate and has not been tampered with. By comparing the calculated checksum with the stored checksum, any discrepancies can be identified, indicating potential data tampering or corruption.
  4. Ensuring data consistency: Regular data verification processes can help maintain data consistency by ensuring that the data stored on the NAS device remains consistent over time. By periodically verifying the integrity of the data, any changes or inconsistencies can be detected and addressed promptly, ensuring the overall consistency of the stored data.
  5. Enhancing data reliability: By implementing regular data verification or checksum processes, the reliability of the data stored on the NAS device can be improved. Data integrity issues can be quickly identified and resolved, minimizing the risk of data loss or corruption, and enhancing the overall reliability of the stored data.

Overall, regular data verification or checksum processes play a crucial role in maintaining data integrity on NAS D-Link DNR-312L devices. They help detect and prevent data corruption, ensure data accuracy and consistency, and enhance the reliability of the stored data.

How to take hard disks out of the NAS and connect them to a PC?

Although NAS DNR-312L can be accessed over the network, you still need to take the hard disks out of the storage device and connect them to a Windows computer. Only in this case will the software be able to scan them properly. Here is what you should do:

  1. Turn off the storage and disconnect it from the power supply.

    WARNING! Before you start taking hard disks out of your NAS device, read the manual carefully. Incorrect actions may damage your network-attached storage and/or the hard disks within the RAID system.

  2. Take the hard disks out of the NAS one by one, carefully removing them from their slots. Remember that the disks are extremely vulnerable: hitting or dropping them may result in serious physical damage.

  3. Make sure to mark each hard disk in accordance with how they were installed inside the NAS.

  4. Remove the hard disks and connect them to the computer. In this video, we have explored what ports are used to connect hard disks, and what to do if there are not enough ports or connectors.

    Go to view
    How to Order Remote Data Recovery

    How to Order Remote Data Recovery

Restoring data with Hetman RAID Recovery

Hetman Raid Recovery

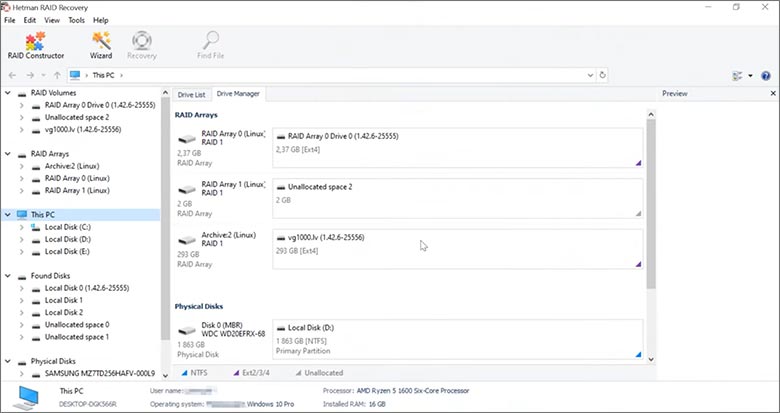
This program recovers data from damaged RAID arrays and is fully compatible with D-Link DNR-312L. The hard disks that make up the RAID contain technical information about the algorithm used to save files. When launched, Hetman RAID Recovery reads this information and puts the damaged array together. Then you can open the disk and save your files. Also, you can recover the files accidentally deleted from the network drive.

Go to view
How to recover data from a D-Link

How to recover data from a D-Link

DNR-312L has 1 HDD slots, and it supports the following array types:

  • None;

NAS supports:

  • exFAT, VFAT, FAT 12 / 16 / 32;
  • NTFS / ReFS;
  • APFS / HFS+;
  • Ext2 / 3 / 4 / ReiserFS / XFS / UFS / ZFS / Btrfs;
  • VMFS / HikvisionFS;

Safe recovery from disk images

This utility lets you save an entire copy of the disk to file and then work with this image instead of the actual disk. Such feature helps to protect data on the disk from:

  • Overwriting during the recovery process;
  • Loss resulting from bad sectors;
  • User mistakes.

To create an image, do the following:

  1. Make sure that you have enough free space to save the image. The image file size usually equals the disk size.

  2. Select the disk in the main window, and choose from the menu ToolsSave Disk. You can select multiple disks to be saved.

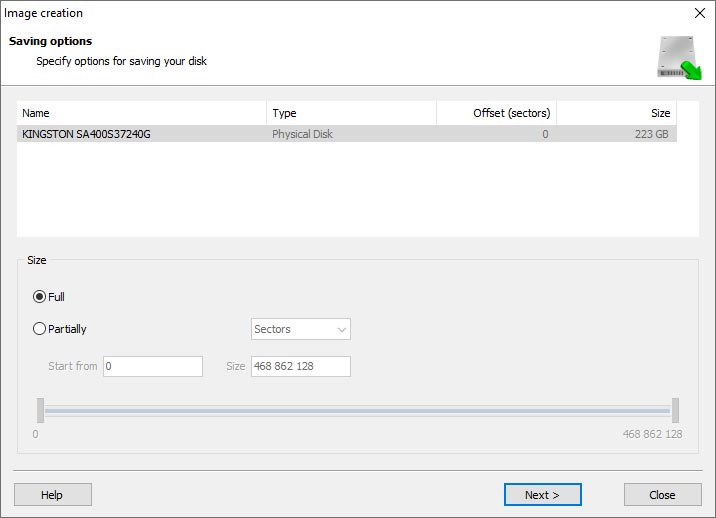
  3. When the image creation wizard starts, you can choose to save the entire disk or select only a part of it. Specify the parameters and click Next.

    Hetman Raid Recovery: Image Creation Wizard
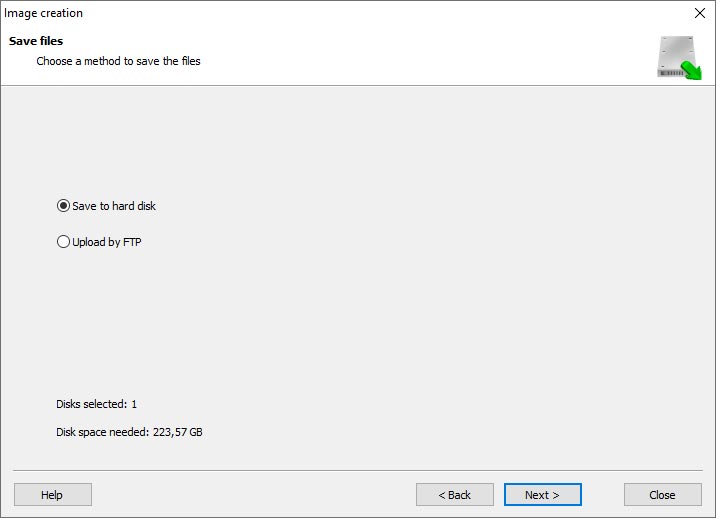
  4. At this stage, you need to choose a directory where to save the image. Choose any disk connected to this PC, or save the image by FTP.

    Hetman Raid Recovery: hoose any disk connected to this PC, or save the image by FTP

Where are user’s files stored?

The D-Link DNR-312L network-attached storage keeps OS Linux operating system files on a separate RAID 1 (mirrored) array. Usually, all NAS systems create several volumes on every hard disk, and the first of them takes up to 2 Gb of space. This is where operating system files are stored. Other volumes are united into a RAID array where user’s data is written.

Comparison of software for RAID recovery

Product Operating system License type RAID controller support Supported file systems Virtual RAID controller support Data recovery from damaged RAID File preview
Hetman RAID Recovery Windows Paid Yes, over 100 controllers FAT, NTFS, Ext2/3/4, HFS+ Yes Yes Yes
DiskInternals RAID Recovery Windows Paid Yes, over 100 controllers FAT, NTFS, Ext2/3/4, HFS+ No Yes Yes
R-Studio Windows, Mac, Linux Paid Yes, over 200 controllers FAT, NTFS, Ext2/3/4, HFS+ Yes Yes Yes
UFS Explorer RAID Recovery Windows, Mac, Linux Paid Yes, over 1,000 controllers FAT, NTFS, Ext2/3/4, HFS+ Yes Yes Yes
EaseUS Data Recovery Windows Paid Yes, over 20 controllers FAT, NTFS, Ext2/3/4, HFS+ No Yes Yes
ReclaiMe Free RAID Recovery Windows Free Yes, over 100 controllers FAT, NTFS, Ext2/3/4, HFS+ Yes Yes Yes

Feedback

We will be happy to answer your questions!

Comments (3)

  • Hetman Software: Data Recovery
    Hetman Software: Data Recovery 9.08.2022 12:31 #
    If you want to ask a question about data recovery, from NAS DNR-312L, feel free to leave a comment!
  • Job Wrigley
    Job Wrigley 12.09.2023 12:47 #
    Is it possible to recover data from a NAS D-Link DNR-312L device if the device is experiencing slow performance or file access issues?
    • Hetman Software
      Hetman Software 12.09.2023 13:59 #

      It is possible to recover data from a NAS device like the D-Link DNR-312L if it is experiencing slow performance or file access issues. However, the process may vary depending on the specific issue and the severity of the problem.

      Here are a few steps you can try to recover data from a NAS device:

      1. Check the network connection: Ensure that the NAS device is properly connected to the network and that there are no issues with the network itself. Slow performance or file access issues can sometimes be caused by network problems.
      2. Reboot the NAS device: Try restarting the NAS device to see if it resolves the performance issues. Sometimes, a simple reboot can help clear any temporary glitches or memory issues that may be causing the problem.
      3. Update firmware: Check if there are any firmware updates available for your NAS device. Updating the firmware can sometimes fix performance issues and improve overall stability.
      4. Check for disk errors: If the NAS device has a built-in disk management feature, you can use it to check for any disk errors or issues. Repairing or replacing faulty disks can help resolve performance problems.
      5. Contact technical support: If the above steps do not resolve the issue, it is recommended to contact the technical support of D-Link or the manufacturer of the NAS device. They may be able to provide further troubleshooting steps or guide you through the data recovery process.

      In some cases, if the NAS device is severely damaged or the data is not accessible due to hardware failure, you may need to consult a professional data recovery service to retrieve the data from the device.

Post comment
User
Leave a reply
Your email address will not be published. Required fields are marked *

Vladimir Artiukh

Author: Vladimir Artiukh, Technical Writer

Vladimir Artiukh is a technical writer for Hetman Software, as well as the voice and face of their English-speaking YouTube channel, Hetman Software: Data Recovery for Windows. He handles tutorials, how-tos, and detailed reviews on how the company’s tools work with all kinds of data storage devices.

Oleg Afonin

Editor: Oleg Afonin, Technical Writer

Oleg Afonin is an expert in mobile forensics, data recovery and computer systems. He often attends large data security conferences, and writes several blogs for such resources as xaker.ru, Elcomsoft and Habr. In addition to his online activities, Oleg’s articles are also published in professional magazines. Also, Oleg Afonin is the co-author of a well-known book, Mobile Forensics - Advanced Investigative Strategies.

Share

Questions and answers

  • What are the key considerations when selecting an additional hard drive for the D-Link DNR-312L NAS?

    When selecting an additional hard drive for the D-Link DNR-312L NAS, there are several key considerations to keep in mind:

    1. Compatibility: Ensure that the hard drive you choose is compatible with the D-Link DNR-312L NAS. Check the NAS manufacturer's website or user manual for a list of recommended or compatible hard drives.
    2. Capacity: Determine the required storage capacity based on your needs. Consider the amount of data you plan to store and the future growth of your storage requirements. Choose a hard drive with sufficient capacity to accommodate your needs.
    3. Drive Type: Decide between a traditional hard disk drive (HDD) or a solid-state drive (SSD). HDDs are generally more affordable and offer larger storage capacities, while SSDs are faster and more durable but come at a higher price per gigabyte.
    4. Drive Speed: Consider the rotational speed of the hard drive. Higher rotational speeds (measured in RPM) generally result in faster data transfer rates. A 7200 RPM drive is typically faster than a 5400 RPM drive.
    5. RAID Support: If you plan to set up a RAID configuration for data redundancy or performance improvement, ensure that the selected hard drive supports the desired RAID level (e.g., RAID 0, RAID 1, etc.).
    6. NAS-specific Features: Some hard drives are specifically designed for NAS devices and offer features like vibration resistance, optimized firmware, and power management. Consider choosing a NAS-specific hard drive for better compatibility and performance.
    7. Budget: Determine your budget for the additional hard drive. Consider the balance between cost and performance to find the best value for your needs.
    8. Brand and Reliability: Choose a reputable brand known for producing reliable hard drives. Look for customer reviews and reliability ratings to ensure the selected hard drive has a good track record.
    9. Warranty: Check the warranty period offered by the hard drive manufacturer. Longer warranties provide added peace of mind in case of any potential failures.
    10. Power Consumption: Consider the power consumption of the hard drive, especially if you plan to run the NAS 24/7. Lower power consumption can result in reduced energy costs and less heat generation.

    By considering these key factors, you can select the most suitable additional hard drive for your D-Link DNR-312L NAS, ensuring optimal performance, reliability, and storage capacity.

  • Can the D-Link DNR-312L NAS support multiple additional hard drives, and if so, what is the maximum number of drives it can accommodate?

    Yes, the D-Link DNR-312L NAS can support multiple additional hard drives. It has two built-in SATA II bays for 3.5" hard drives, and it also supports external USB storage devices. The maximum number of drives it can accommodate depends on the configuration and capacity of the hard drives used.

  • Are there any specific requirements or compatibility issues to be aware of when installing an additional hard drive in the D-Link DNR-312L NAS?

    Yes, there are some specific requirements and compatibility issues to consider when installing an additional hard drive in the D-Link DNR-312L NAS. Here are a few important points to keep in mind:

    1. Hard Drive Compatibility: The D-Link DNR-312L NAS supports 3.5" SATA hard drives. Ensure that the hard drive you choose is compatible with this specification.
    2. Maximum Capacity: The DNR-312L NAS supports up to 8TB hard drives. If you plan to install a larger capacity hard drive, it may not be recognized or fully utilized by the NAS.
    3. RAID Configuration: The DNR-312L NAS supports RAID 0, RAID 1, and JBOD (Just a Bunch of Disks) configurations. Before installing an additional hard drive, decide on the RAID configuration you want to use and make sure the new drive matches the existing one (if applicable).
    4. Formatting: When you install a new hard drive, it needs to be formatted to be recognized by the NAS. The DNR-312L NAS supports NTFS, FAT32, EXT3, and EXT4 file systems.
    5. Power Supply: Ensure that the power supply of the DNR-312L NAS is capable of providing enough power for the additional hard drive. If the power supply is not sufficient, it may cause stability issues or failure.
    6. Firmware Compatibility: Check the D-Link website or the product documentation to ensure that the firmware version of your DNR-312L NAS is compatible with the specific hard drive you plan to install. Sometimes, firmware updates may be required to support newer hard drive models.

    It is always recommended to consult the user manual or contact D-Link support for specific guidance and compatibility information before installing an additional hard drive in the DNR-312L NAS.

Hello! This is AI-based Hetman Software virtual assistant, and it will answer any of your questions right away.
Start Chat