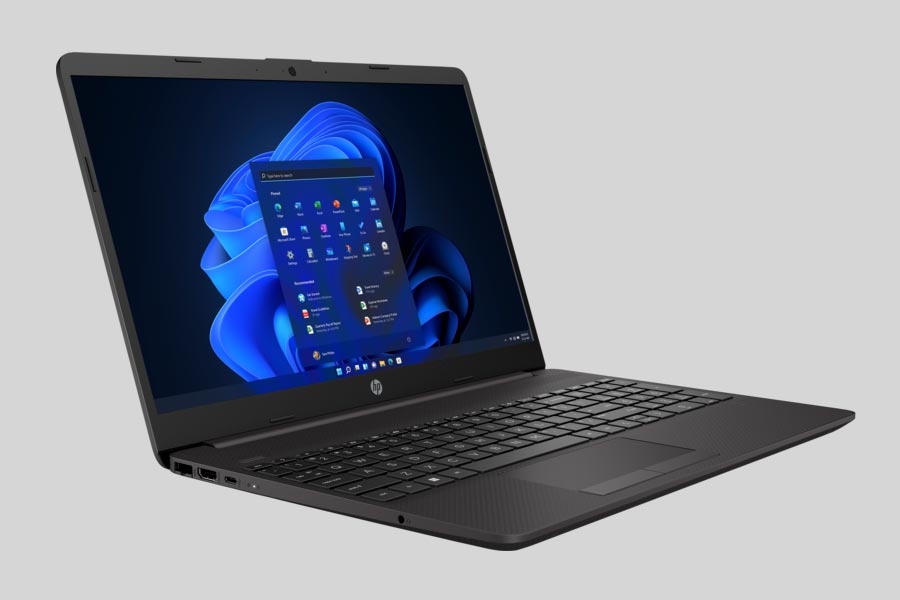
- What are the Common Causes of Data Loss or Failure on an HP Laptop?
- Restoring the Laptop Files
- Restoring HP Laptop System
- Restoring HP Laptop Using Recovery Drive
- Restoring Factory Settings of HP Laptop
- Laptop Restoring Using a Hidden Recovery Partition
- Restoring Laptop Password
- Reflashing and BIOS Recovery
Methods applied to restore working capacity of a laptop are in many ways similar to those used for desktop PCs, but there are also peculiarities only typical for portable computers.
What are the Common Causes of Data Loss or Failure on an HP Laptop?
- Hardware failure: This can include issues with the hard drive, motherboard, or other internal components that can lead to data loss.
- Accidental deletion: Users may accidentally delete important files or folders, leading to data loss.
- Software corruption: Corrupted software or operating system files can cause data loss or failure on an HP laptop.
- Virus or malware infection: Malicious software can infect an HP laptop and cause data loss or corruption.
- Power outages or surges: Sudden power outages or power surges can disrupt the normal functioning of an HP laptop and lead to data loss.
- Physical damage: Dropping or mishandling an HP laptop can cause physical damage to the hard drive or other components, resulting in data loss.
- Human error: Mistakes such as improper shutdowns, formatting the wrong drive, or mishandling data can lead to data loss on an HP laptop.
- Natural disasters: Events such as floods, fires, or earthquakes can damage an HP laptop and cause data loss.
- Theft or loss: If an HP laptop is stolen or lost, the data stored on it may be compromised or lost.
- Corrupted or outdated backups: If backups are not properly maintained, corrupted, or outdated, data loss can occur on an HP laptop.
Restoring the Laptop Files
Do you need to restore files from HP Laptop?
Use the program to recover deleted files
When the files are deleted from the Recycle Bin and it is not possible to recover them using operating system standard means, the most effective way is to use the program Hetman Partition Recovery.
For this:
-
Download the program, install and run it. Check out the features of the program and step by step instructions.
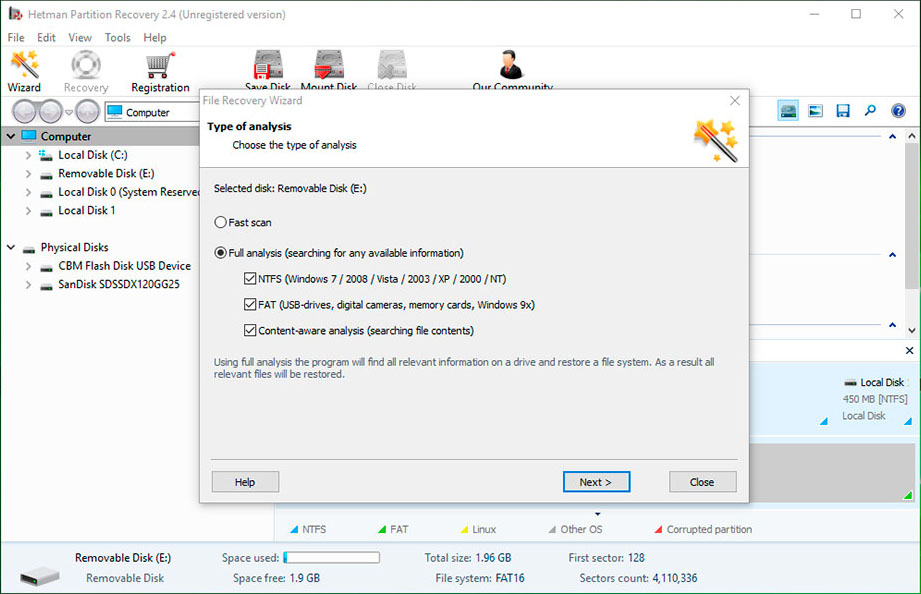
By default, the user will be asked to use File Recovery Wizard. Click «Next» button and specify the disk from which you want to recover files.
Double-click on the disk and select the type of analysis. Choose «Full analysis» and wait for the disk scanning process completion.
After scanning process completion you will be shown the files found. Select the files you want and click the «Restore» button.
Select one of the proposed ways to save files. Do not save the recovered files to the disk from which the files were deleted - they can be overwritten.
Restore files from the Recycle Bin
Check Windows Recycle Bin, the files may be stored there. For this:
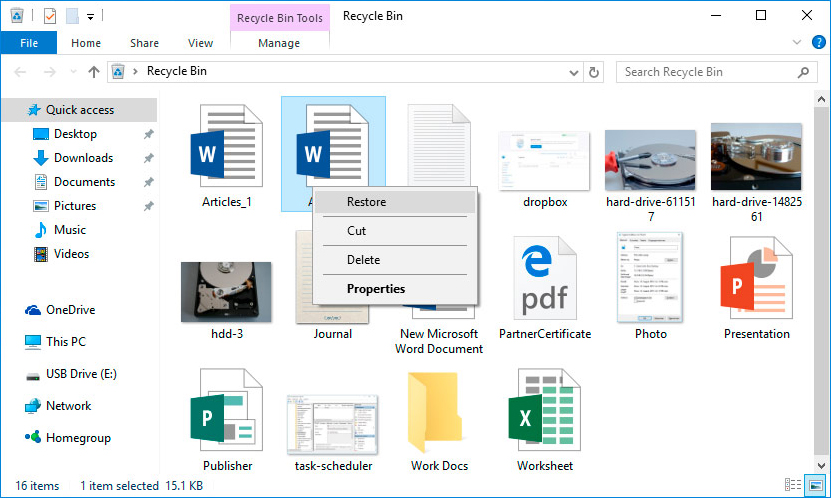
Go to Recycle Bin.
Locate the file or folder you want to restore.
Right-click on the desired item, and choose Restore in the context menu.
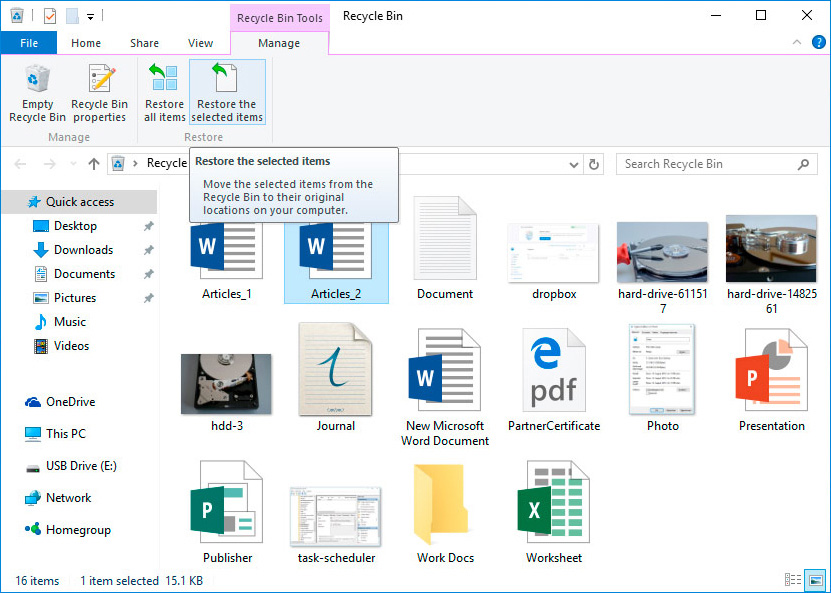
Or select the files or folders you want to restore and click on the corresponding function in the menu of Recycle Bin window: tab Manage / Restore the selected items.
Restoring HP Laptop System
Windows restoring methods depend on the cause of system files loss, the availability of data backup copy, etc.
Run the System File Checker sfc /scannow
With this command, you can restore the system files in case Windows is operational and boots.
For this:
In the Command prompt, type sfc /scannow command, and then press Enter.
Start a Command prompt as an Administrator.
After restoring the system files, you’ll need to restart Windows.

Restore Windows from a restore point
Note: Windows return from a restore point only applies to system and software operating system settings. The system rollback deletes all the programs that were installed after its creation and does not restore the files deleted previously.
To return Windows to a restore point, do the following:
-
Open Control Panel / Restore / Launch System Restore and click Next.

-
Select a point you need from the list and click Next.
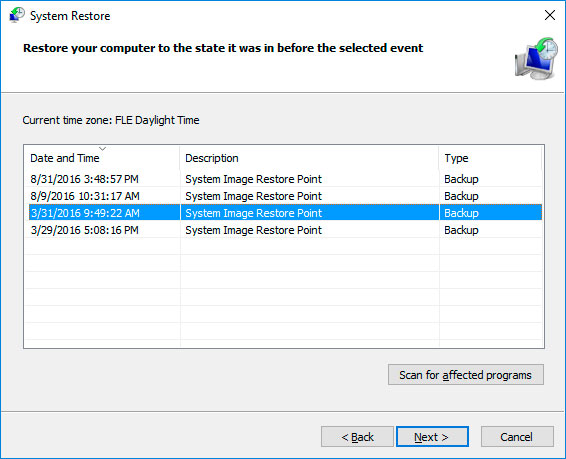
-
Confirm your restore point and the process will start.
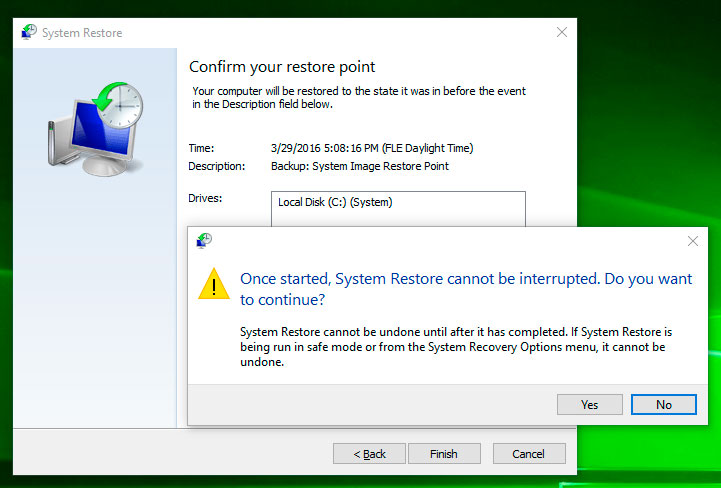
Run the Recovery Environment
If as a result of damage to system files, the operating system loses operability and does not boot, then the recovery environment helps return the files.
You can start it:
By pressing F8 key during the computer boot;
Using the boot disk (or USB-stick).
Note. The first option is possible only if the boot partition was created during installation of the operating system. This section is created by the system for its recovery and, depending on the system its size can be 100 MB, 350 MB or 450 MB.

How to Recover Windows 10, 8, 7 System Files (SFC, DISM)
When starting the Recovery Environment, choose the item System Restore or Repair your computer. The name of the menu items can vary depending on the version of the operating system and a method for starting the Recovery Environment.
Restoring HP Laptop Using Recovery Drive
To return HP Laptop operability using recovery drive follow the instructions.
Create a recovery drive
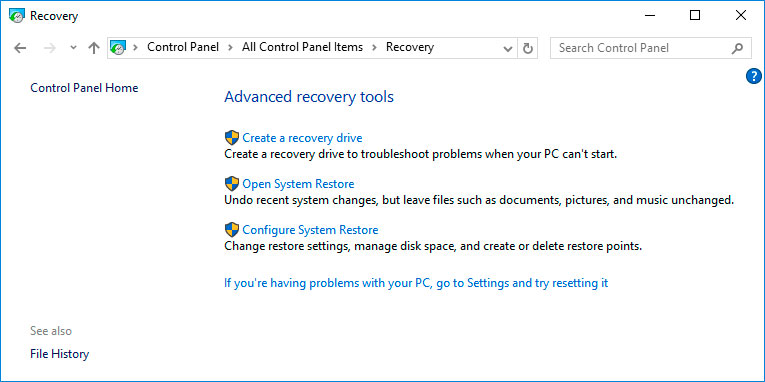
Go to Control Panel / Recovery.
Choose "Create a recovery drive."
Insert an optical disk into the disk drive, or plug in a USB stick into the port.
Select it as a media for the recovery drive and create the drive by following system directions.
Wait until the end of the process and restart the computer.
You will need a clean CD / DVD disk or an empty USB stick to create a recovery drive.

System recovery from an image if Windows boots
Connect the drive with Windows image to a computer.
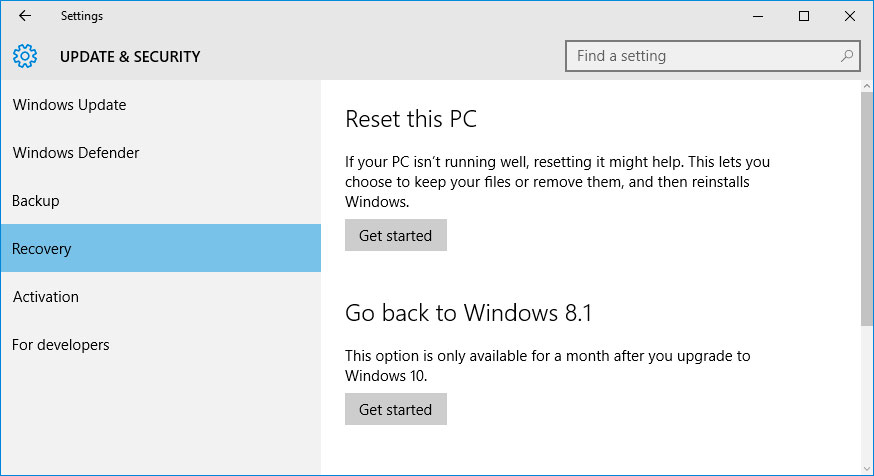
Open the Control Panel / Recovery
Select a menu item «In the event of a computer fault, go to its settings and try to change them».
In the menu «Special Boot Options», click «Restart Now» key.
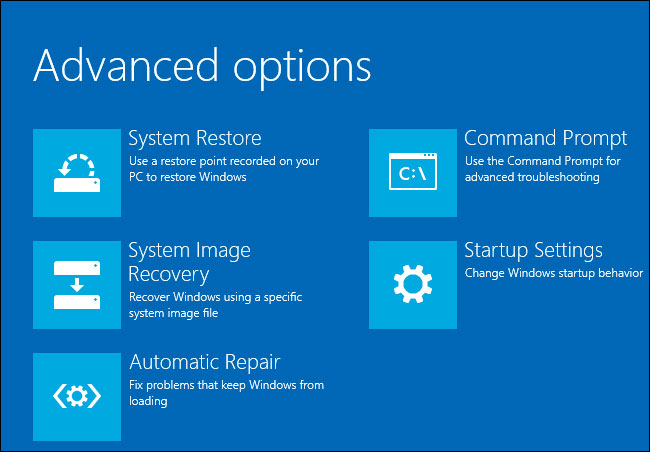
After the computer restarts in the proposed menu, select Diagnostics / Advanced Options / System Image Recovery or System Restore (depending on the desired method of recovery).
Continue the recovery process following the instructions of the wizard and clicking the Next button. The program will automatically carry out the further work.
Wait for the end of the process and restart the computer.
System recovery from an image if Windows does not boot
Set in the BIOS or UEFI booting of the operating system from CD, DVD or USB drive (depending on the bootable media).
Insert it into the drive (or connect to USB-port) the drive with the system image.
Restart your computer.
In the proposed menu, select Diagnostics / Computer Restore. The program will carry out the further work automatically.
Wait until the end of the process and restart the computer.
Restoring Factory Settings of HP Laptop
To restore the system laptop applies the same methods as for the desktop computer. A further option to restore on a HP Laptop is the possibility to return to the factory settings with the help of a hidden Recovery partition, which is pre-installed by the manufacturer.
Note. When restoring the Laptop factory settings: all user data from the Laptop system partition will be deleted; the system partition of Laptop will be formatted; all the software and apps pre-installed by the manufacturer will be installed.
To restore the Laptop factory settings:
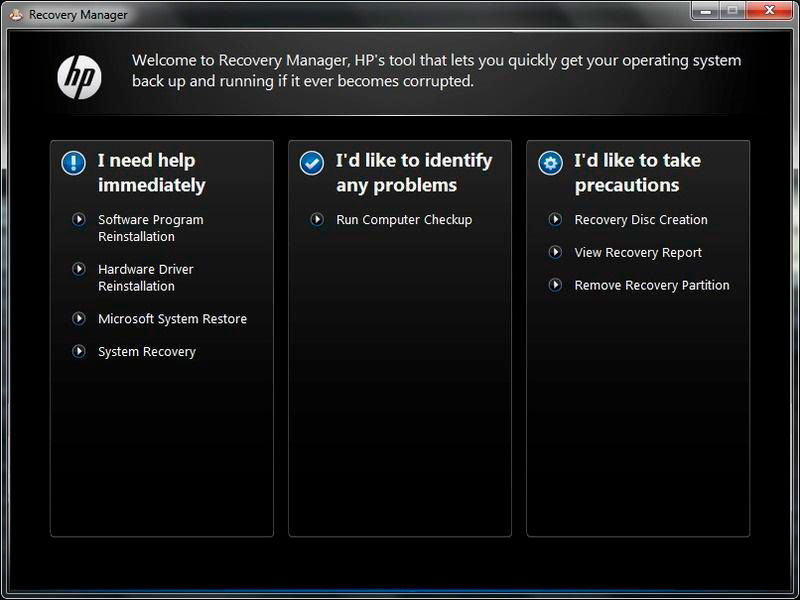
Start the Laptop factory settings restore program (system reset).
Select from the menu the function of System Restore (or factory settings) and follow all the system instructions.
Wait until the end of the process and restart the computer.
Note. In various Laptops this occurs differently. For some manufacturers this utility is started by pressing one or a combination of keys while switching the Laptop on while others carry out the process using their own software (typically pre-installed).
Laptop Restoring Using a Hidden Recovery Partition
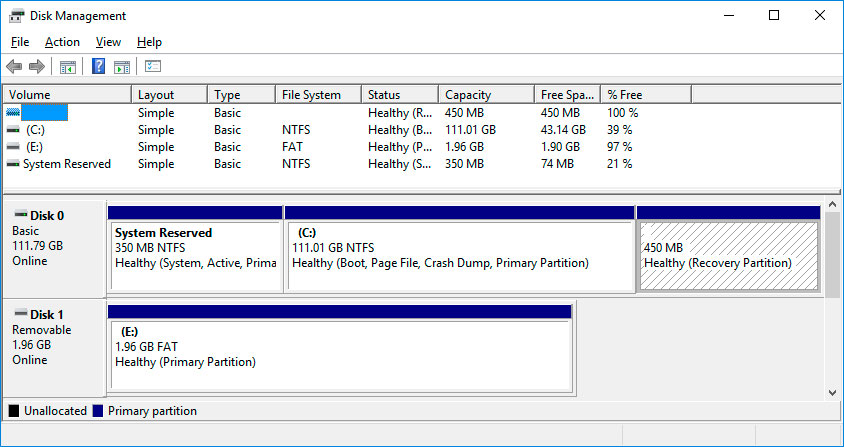
A Starting from Windows 7 when you install the operating system on your computer in addition to the main (working) partitions the hidden (system) are also created. These partitions are not visible in Windows Explorer, they are only available in the Disk Manager. Name of the partitions:
System Reserved (Reserved by the system);
Untitled (Recovery Partition).
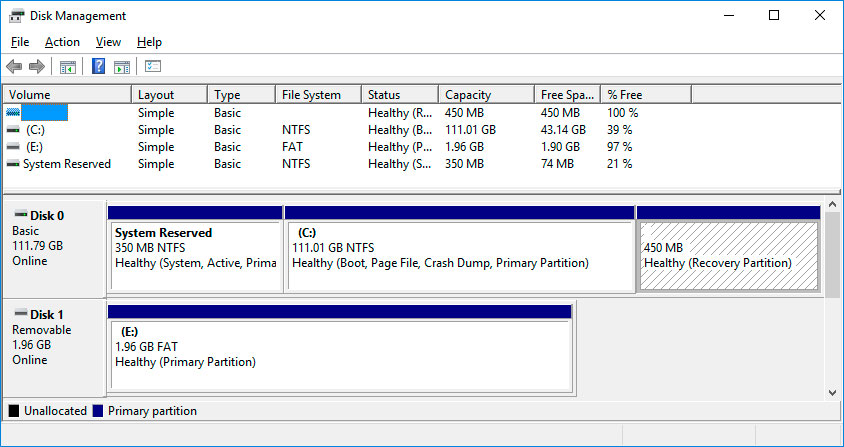
In the System Reserved partition the files of boot configuration data (BCD) and boot manager (bootmgr) are stored. Thus, the system protects the boot files from being overwritten, and also with the help of this partition log on into the system recovery environment is carried out.
Also in Laptop the pre-installed by the manufacturer hidden Laptop partition recovery is present. With the help of this partition the Laptop restore to the factory settings is carried out.

How to Reset Windows 10 or 8 PC to Factory Default Settings (All Methods)

How to Reset Windows 10 or 8 PC If The Operating System Won't Boot
Restoring Laptop Password
Do you need to restore your Laptop password?
Retrieve forgotten user password with Windows tools
Note. Before restoring access to the user account, check the prompt, which is located on the Welcome screen beside the password entry field.
If the prompt did not help:
Log on to the computer using the Administrator account.
-
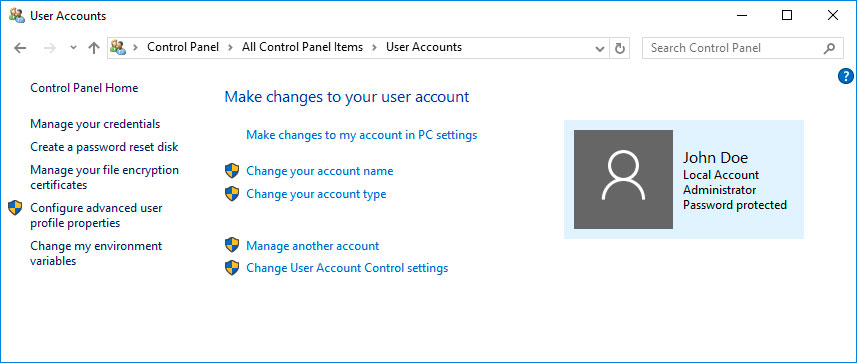
Go to Control Panel / User Accounts.
-
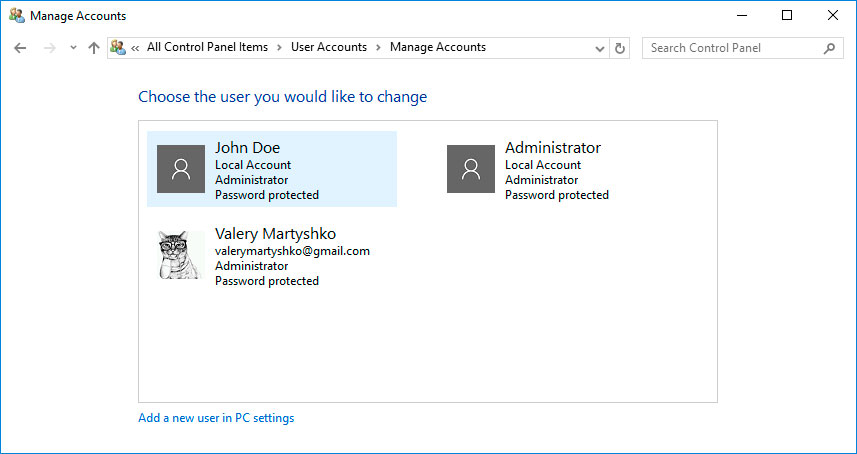
Click Manage another account.
-
Select the desired account.
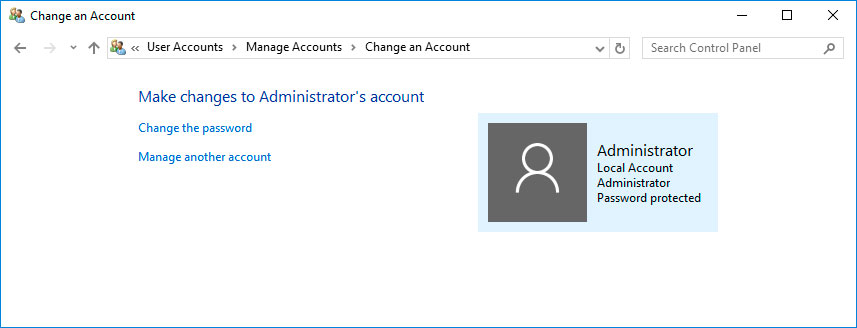
- Select Change Password.
-
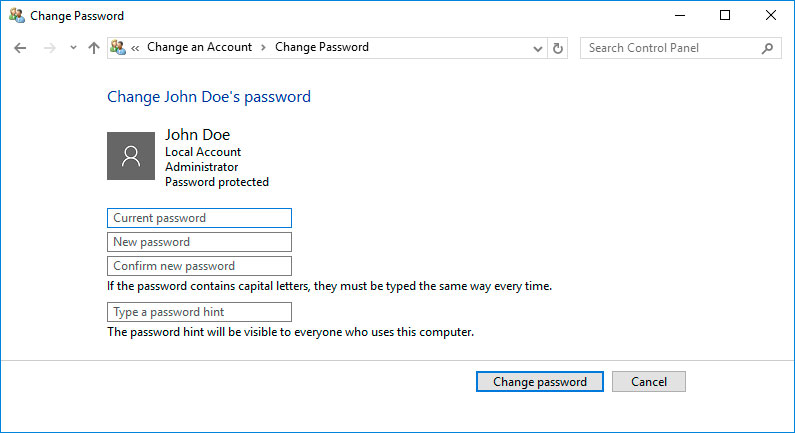
Enter a new password and click Change Password key.
-
Exit the Administrator account and log in to your account using your new password.
Restore the password of built-in Administrator account
If access to the local Administrator account is lost, it must be received in the first place. For this:
Boot Windows by means of an installation disc c.
Select «System Restore» in the first window with the «Install» key.
-
Select Diagnostics / Advanced Options / Command Prompt in the next window.
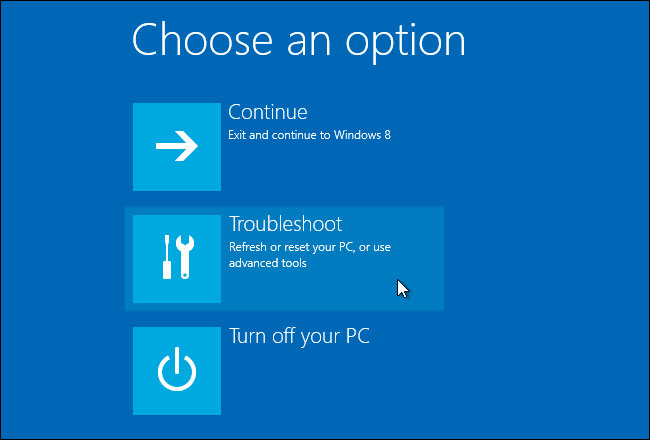
Click on the menu item Command Prompt.
-
Type in the opened Command Prompt window:
move с:windowssystem32utilman.exe с:windowssystem32utilman.bak;
copy с:windowssystem32cmd.exe с:windowssystem32utilman.exe.
Where «c:» is the drive on which Windows folder is located.
Note.These commands allow you to open Command prompt window on the login screen, with the help of Special Features key or by using the keyboard shortcut Win + U.
Remove the installation CD from the computer.
Stop the operating system installation and restart the computer.
In the password entry field, run Command prompt by selecting Special Features menu or by pressing the keyboard shortcut Win + U.
If the password entry field does not show administrator account, you must activate it. To do this, use the following command: net user Administrator / active: yes, and then restart the computer.
-
Type net user command to display all computer users.
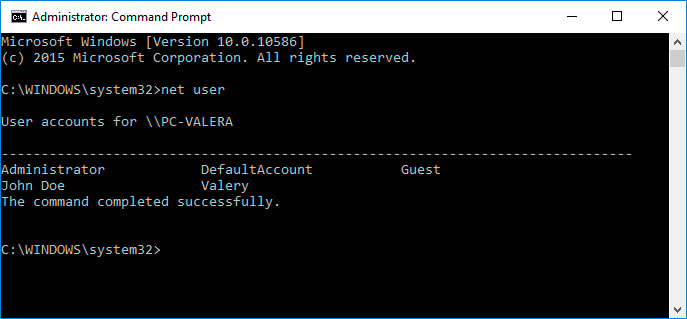
Enter the command net user name password. Where name is the user name into password - a new password. That is, to reset the administrator password and set a new password (for example - qwerty), in this case you must enter the command: net user Administrator qwerty.
Restart your computer and enter the administrator account using the new password. After the login to Windows administrator account is made, the password can be changed at any time using Windows tools.
Reflashing and BIOS Recovery
In order to recovery operability of Laptop BIOS, download the BIOS reflashing for your Laptop model. Reflashes can be found on the Laptop or motherboard manufacturer site. You can reflash BIOS from DOS or Windows.
Note. Sometimes for the successful implementation of the reflashing you need to change the name of the reflashing file to the value set by the manufacture.
BIOS in DOS reflashing
Download the BIOS reflashing for your laptop model, unpack it with any archive and save it on a USB flash drive.
Insert this USB flash drive in the Laptop.
-
Turn on the Laptop with the help of one of the shortcut keys (each Laptop model provides its own shortcut, please read the instructions for your Laptop model). Here are some options: Win + Esc; Fn + Esc; Win + B; Fn + B; Win + M; Fn + M; Win + F; Fn + F.
Then, without releasing the key, press the Laptop power button.
Wait for BIOS recovery process finish.
BIOS in Windows reflashing
Disable any programs that are running on a Laptop.
Disconnect all network connections and the Internet.
Charge the battery or connect to the mains supply.
Disconnect all the devices connected to the Laptop (except the mouse).
Start the reflashing file with the .bat extension (sometimes .exe).
Wait for the BIOS reflashing process and reboot the computer.
Models Laptop HP:
HP EliteBook
- 720 G1;
- 740 G1;
- 750 G1;
- 725 G2;
- 745 G2;
- 755 G2;
- Revolve 810 G2;
- 820 G1;
- 840 G1;
- 850 G1;
- Folio 1040 G1;
- Folio 9480m;
- ElitePad 1000 G2;
- 720 G2;
- 740 G2;
- 750 G2;
- Revolve 810 G3;
- 820 G2;
- 840 G2;
- 850 G2;
- Folio 1020 G1;
- Folio 1040 G2;
- Elite x2 1011 G1;
- 725 G3;
- 745 G3;
- 755 G3;
- 820 G3;
- 840 G3;
- 850 G3;
- Folio G1;
- 1030 G1;
- 1040 G3;
- Elite x2 1012 G1;
- 725 G4;
- 745 G4;
- 755 G4;
- 820 G4;
- 840 G4;
- 850 G4;
- 840r G4;
- x360 1020 G2;
- x360 1030 G2;
- 1040 G4;
- Elite x2 1012 G2;
- 735 G5;
- 745 G5;
- 755 G5;
- x360 830 G5;
- 830 G5;
- 840 G5;
- 850 G5;
- x360 1030 G3;
- x360 1040 G5;
- 1050 G1;
- Elite x2 1013 G3;
- 735 G6;
- 745 G6;
- x360 830 G6;
- 830 G6;
- 840 G6;
- 850 G6;
- x360 1030 G4;
- x360 1040 G6;
- Elite x2 G4;
- Elite Dragonfly;
- x360 830 G7;
- 830 G7;
- 840 G7;
- 850 G7;
- 835 G7;
- 845 G7;
- 855 G7;
- x360 1030 G7;
- x360 1040 G7;
- Elite Dragonfly;
- 840 G8;
- x360 830 G8;
- 830 G8;
- 840 Aero G8;
- 840 G8;
- 850 G8;
- 835 G8;
- 845 G8;
- 855 G8;
- x360 1030 G8;
- x360 1040 G8;
- Elite Dragonfly G2;
- Elite Dragonfly Max;
- Elite Folio;
- Elite x2 G8;
- Elite Wireless Earbuds;
- Dev One;
- 630 G9;
- 640 G9;
- 650 G9;
- 635 G9;
- 645 G9;
- 655 G9;
- 830 G9;
- Elite x360 830 G9;
- 840 G9;
- 860 G9;
- 835 G9;
- 845 G9;
- 865 G9;
- 1040 G9;
- Elite x360 1040 G9;
- Elite Dragonfly G3;
- Elite Dragonfly Chromebook;
- Elite Dragonfly Chromebook Enterprise;
HP EliteBook
- 2530p;
- 2730p;
- 6930p;
- 8530p;
- 8530w;
- 8730w;
- 2540p;
- 2740p;
- 8440p;
- 8440w;
- 8540p;
- 8540w;
- 8740w;
- 2560p;
- 2760p;
- 8460p;
- 8460w;
- 8560p;
- 8560w;
- 8760w;
- Revolve 810;
- 2170p;
- 2570p;
- 8470p;
- 8470w;
- Folio 9470m;
- 8570p;
- 8570w;
- 8770w;
HP ZBook
- 14;
- 15;
- 17;
- 14 G2;
- 15u G2;
- 15 G2;
- 17 G2;
- Studio G3;
- 15u G3;
- 15 G3;
- 17 G3;
- x2 G4;
- 14u G4;
- Studio G4;
- 15u G4;
- 15 G4;
- 17 G4;
- 14u G5;
- 15u G5;
- Studio G5;
- Studio x360 G5;
- 15v G5;
- 15 G5;
- 17 G5;
- 14u G6;
- 15u G6;
- 15 G6;
- 17 G6;
- Firefly 14 G7;
- Firefly 15 G7;
- Create G7;
- Studio G7;
- Power 15 G7;
- Fury 15 G7;
- Fury 17 G7;
- Power 17 G7;
- Firefly 14 G8;
- Firefly 15 G8;
- Power 15 G9;
- Studio 16 G9;
- Fury 16 G9;
- Firefly 14 G9;
- Firefly 16 G9;
HP Envy
- 133;
- dv7-7200;
- dv7-7300;
- x2;
- 13;
- 14;
- x360;
- 15;
- 17;
- Dv5;
- Dv6;
- Dv7;
- 14 Spectre;
- Spectre XT;
HP ProBook;
- 4310s;
- 4311s;
- 4410s;
- 4411s;
- 4510s;
- 4710s;
- 4415s;
- 4416s;
- 4515s;
- 4320s;
- 4321s;
- 4420s;
- 4421s;
- 4520s;
- 4720s;
- 4325s;
- 4326s;
- 4425s;
- 4525s;
- 4230s;
- 4330s;
- 4331s;
- 4430s;
- 4431s;
- 4520s;
- 4530s;
- 4730s;
- 4435s;
- 4436s;
- 4535s;
- 4340s;
- 4341s;
- 4440s;
- 4441s;
- 4540s;
- 4740s;
- 4445s;
- 4446s;
- 4545s;
- 6570b;
- 6440b;
- 6540b;
- 6445b;
- 6545b;
- 6450b;
- 6550b;
- 6455b;
- 6555b;
- 6360b;
- 6460b;
- 6560b;
- 6465b;
- 6565b;
- 6470b;
- 6570b;
- 6475b;
- 5330m;
- 5310m;
- 5220m;
- 5320m;
- 5330m;
- 440 G0;
- 450 G0;
- 470 G0;
- x360 11 G1 EE;
- 430 G1;
- 440 G1;
- 450 G1;
- 470 G1;
- 445 G1;
- 455 G1;
- 640 G1;
- 640 G1;
- 650 G1;
- 645 G1;
- 655 G1;
- Pro x2 410 G1;
- Pro x2 612 G1;
- x360 11 G2 EE;
- 430 G2;
- 440 G2;
- 450 G2;
- 470 G2;
- 445 G2;
- 455 G2;
- 640 G2;
- 650 G2;
- 645 G2;
- 655 G2;
- Pro x2 410 G2;
- Pro x2 612 G2;
- x360 11 G3 EE;
- 430 G3;
- 440 G3;
- 446 G3;
- 450 G3;
- 470 G3;
- 455 G3;
- 640 G3;
- 650 G3;
- 645 G3;
- 655 G3;
- x360 11 G4 EE;
- 430 G4;
- 440 G4;
- 450 G4;
- 470 G4;
- 455 G4;
- 640 G4;
- 650 G4;
- 645 G4;
- 645 G4 Pakistan;
- x360 11 G5 EE;
- 430 G5;
- 440 G5;
- x360 440 G1;
- 450 G5;
- 470 G5;
- 455 G5;
- 640 G5;
- 650 G5;
- x360 11 G6 EE;
- 430 G6;
- 440 G6;
- 450 G6;
- 445 G6;
- 445R G6;
- 455R G6;
- x360 435 G7;
- 430 G7;
- 440 G7;
- 450 G7;
- 445 G7;
- 455 G7;
- 430 G8;
- 440 G8;
- 450 G8;
- x360 435 G8;
- 445 G8;
- 455 G8;
- x360 435 G8;
- 630 G8;
- 640 G8;
- 650 G8;
- 635 Aero G8;
HP Pavilion;
- dv9000;
- dv9200;
- dv9700;
- dv9700t;
- dv6000;
- dv6058cl;
- dv6200;
- dv6500;
- dv6500tse;
- dv6618eo;
- dv6767tx;
- dv2890nr;
- dv2700se;
- dv2700bw;
- dv2700t;
- dv2700z;
- dv2500se;
- dv2500bw;
- dv2500t;
- dv2500z;
- dv24xx;
- dv2322la;
- dv2200la;
- dv2000t;
- dv2000z;
- dv1000;
- dv1040 ;
- dv1600;
- dv1658 ;
- dv7-1000;
- dv7-1400;
- dv7-2300;
- dv7-3000;
- dv7-3300;
- dv7-4000;
- dv7-4300;
- dv7-5000;
- dv7-6000;
- dv7-6100;
- dv7-6b00;
- dv7-6c00;
- dv7-7000;
- dv7-7100;
- dv5se;
- dv5t;
- dv5z;
- dv4se;
- dv4-1502yu;
- dv4z;
- DV2z;
- TX1000;
- TX2000;
- TX2500;
HP Stream
- 10;
- 11;
- 11 Pro;
- 13;
- 14;
- 14 Pro;
- x360;
- 7;
- 8;


