- What are the Common Causes of Data Loss or Failure on an Packard Bell Laptop?
- Restoring the Laptop Files
- Restoring Packard Bell Laptop System
- Restoring Packard Bell Laptop Using Recovery Drive
- Restoring Factory Settings of Packard Bell Laptop
- Laptop Restoring Using a Hidden Recovery Partition
- Restoring Laptop Password
- Reflashing and BIOS Recovery
Methods applied to restore working capacity of a laptop are in many ways similar to those used for desktop PCs, but there are also peculiarities only typical for portable computers.
What are the Common Causes of Data Loss or Failure on an Packard Bell Laptop?
- Hardware failure: This can include issues with the hard drive, motherboard, or other internal components of the laptop.
- Accidental deletion: Users may accidentally delete important files or data without realizing it.
- Virus or malware infection: Malicious software can corrupt or delete files on the laptop.
- Power surges or outages: Sudden power surges or outages can cause data loss by interrupting the writing process to the hard drive.
- Physical damage: Dropping or mishandling the laptop can cause physical damage to the hard drive, resulting in data loss.
- Software corruption: Errors in the operating system or software programs can cause data loss or corruption.
- Human error: Mistakes such as formatting the wrong drive or improper handling of data can lead to data loss.
- Theft or loss: If a laptop is stolen or lost, all data stored on it may be compromised.
- Natural disasters: Events such as floods, fires, or earthquakes can damage the laptop and result in data loss.
- Aging hardware: Over time, the components of a laptop may degrade, leading to potential data loss or failure.
Restoring the Laptop Files
Do you need to restore files from Packard Bell Laptop?
Use the program to recover deleted files
When the files are deleted from the Recycle Bin and it is not possible to recover them using operating system standard means, the most effective way is to use the program Hetman Partition Recovery.
For this:
-
Download the program, install and run it. Check out the features of the program and step by step instructions.
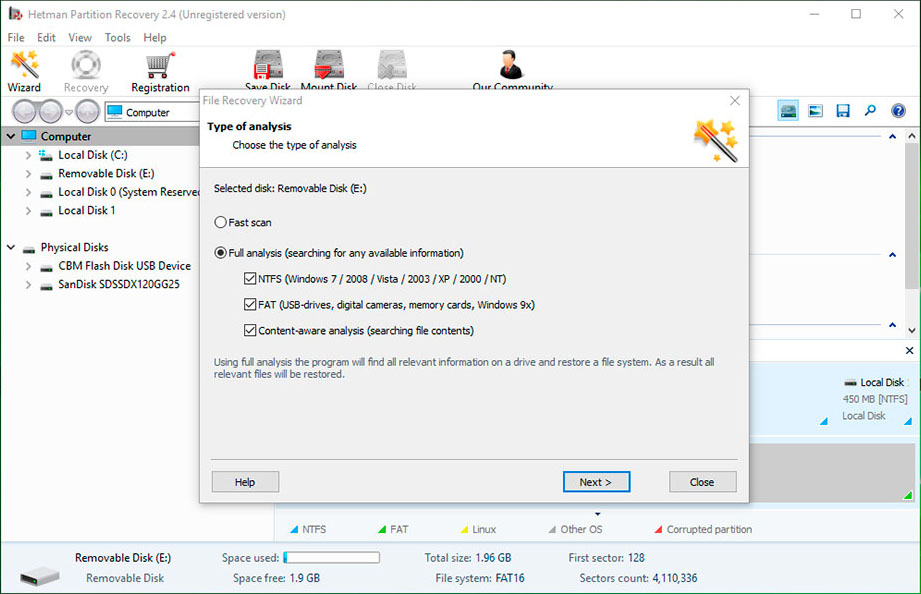
By default, the user will be asked to use File Recovery Wizard. Click «Next» button and specify the disk from which you want to recover files.
Double-click on the disk and select the type of analysis. Choose «Full analysis» and wait for the disk scanning process completion.
After scanning process completion you will be shown the files found. Select the files you want and click the «Restore» button.
Select one of the proposed ways to save files. Do not save the recovered files to the disk from which the files were deleted - they can be overwritten.
Restore files from the Recycle Bin
Check Windows Recycle Bin, the files may be stored there. For this:
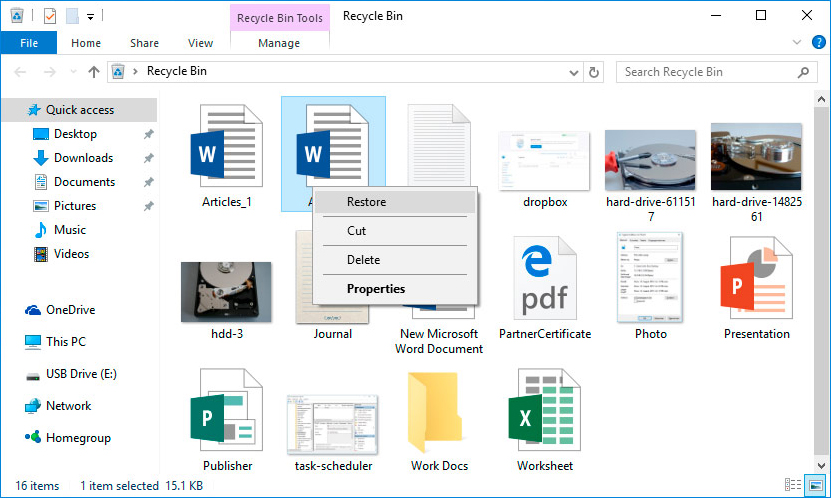
Go to Recycle Bin.
Locate the file or folder you want to restore.
Right-click on the desired item, and choose Restore in the context menu.
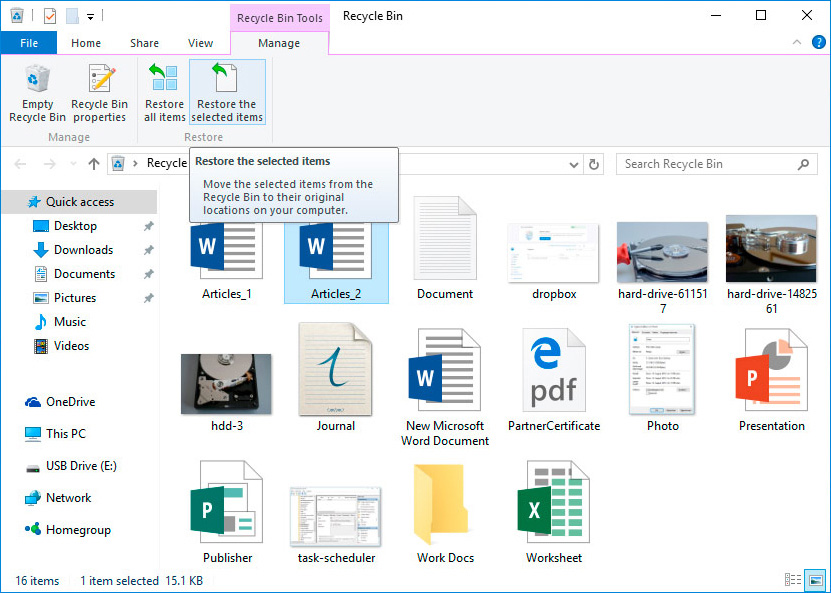
Or select the files or folders you want to restore and click on the corresponding function in the menu of Recycle Bin window: tab Manage / Restore the selected items.
Restoring Packard Bell Laptop System
Windows restoring methods depend on the cause of system files loss, the availability of data backup copy, etc.
Run the System File Checker sfc /scannow
With this command, you can restore the system files in case Windows is operational and boots.
For this:
In the Command prompt, type sfc /scannow command, and then press Enter.
Start a Command prompt as an Administrator.
After restoring the system files, you’ll need to restart Windows.

Restore Windows from a restore point
Note: Windows return from a restore point only applies to system and software operating system settings. The system rollback deletes all the programs that were installed after its creation and does not restore the files deleted previously.
To return Windows to a restore point, do the following:
-
Open Control Panel / Restore / Launch System Restore and click Next.

-
Select a point you need from the list and click Next.
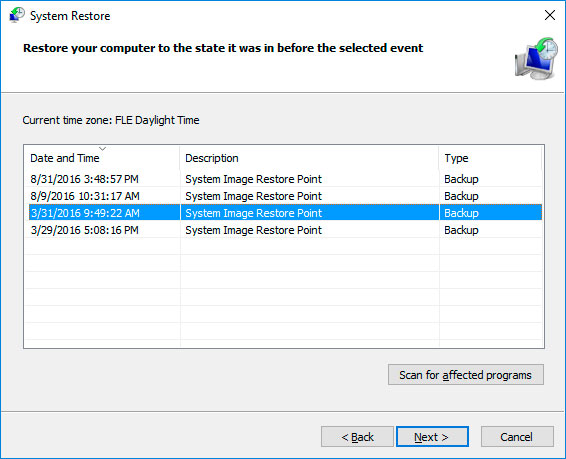
-
Confirm your restore point and the process will start.
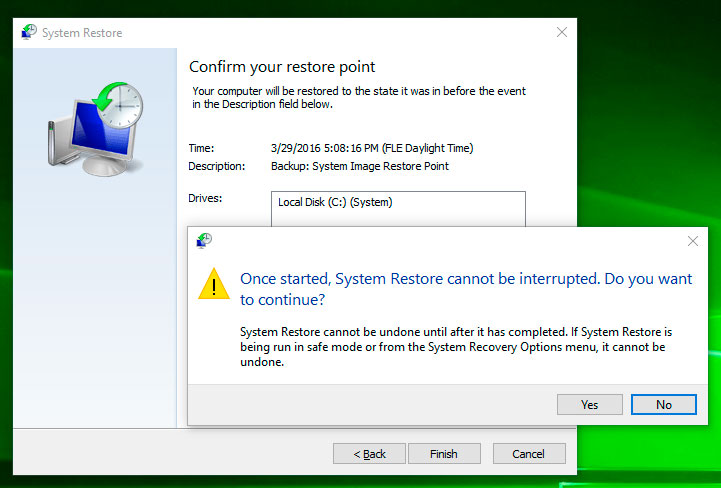
Run the Recovery Environment
If as a result of damage to system files, the operating system loses operability and does not boot, then the recovery environment helps return the files.
You can start it:
By pressing F8 key during the computer boot;
Using the boot disk (or USB-stick).
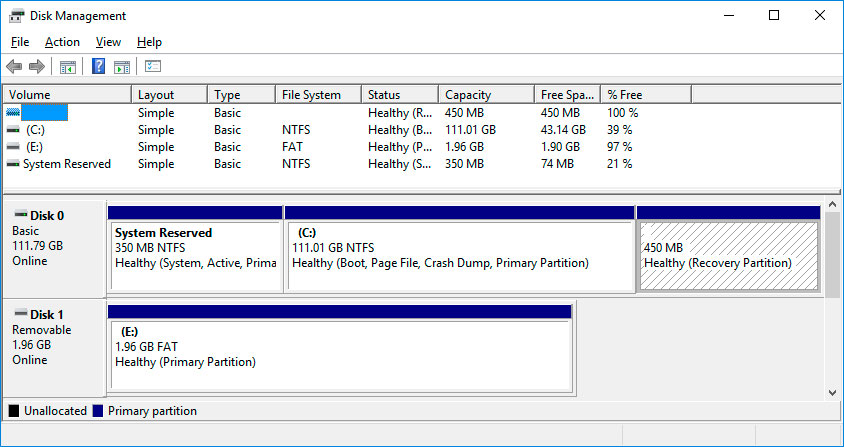
Note. The first option is possible only if the boot partition was created during installation of the operating system. This section is created by the system for its recovery and, depending on the system its size can be 100 MB, 350 MB or 450 MB.

How to Recover Windows 10, 8, 7 System Files (SFC, DISM)
When starting the Recovery Environment, choose the item System Restore or Repair your computer. The name of the menu items can vary depending on the version of the operating system and a method for starting the Recovery Environment.
Restoring Packard Bell Laptop Using Recovery Drive
To return Packard Bell Laptop operability using recovery drive follow the instructions.
Create a recovery drive
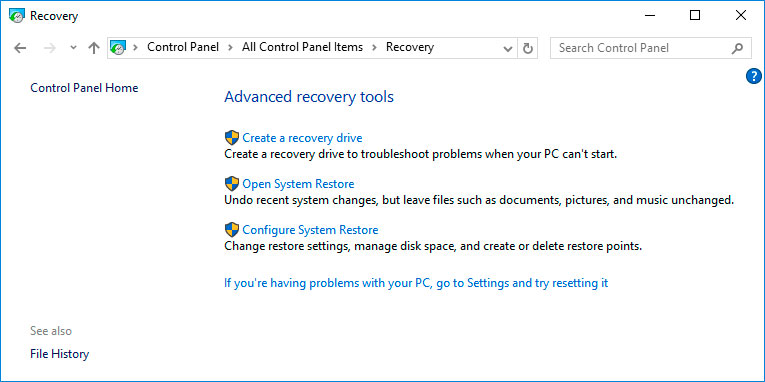
Go to Control Panel / Recovery.
Choose "Create a recovery drive."
Insert an optical disk into the disk drive, or plug in a USB stick into the port.
Select it as a media for the recovery drive and create the drive by following system directions.
Wait until the end of the process and restart the computer.
You will need a clean CD / DVD disk or an empty USB stick to create a recovery drive.

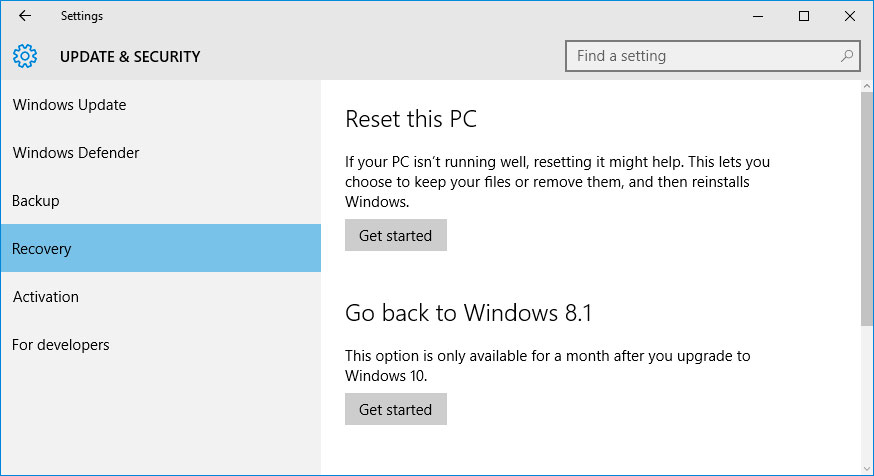
System recovery from an image if Windows boots
Connect the drive with Windows image to a computer.
Open the Control Panel / Recovery
Select a menu item «In the event of a computer fault, go to its settings and try to change them».
In the menu «Special Boot Options», click «Restart Now» key.
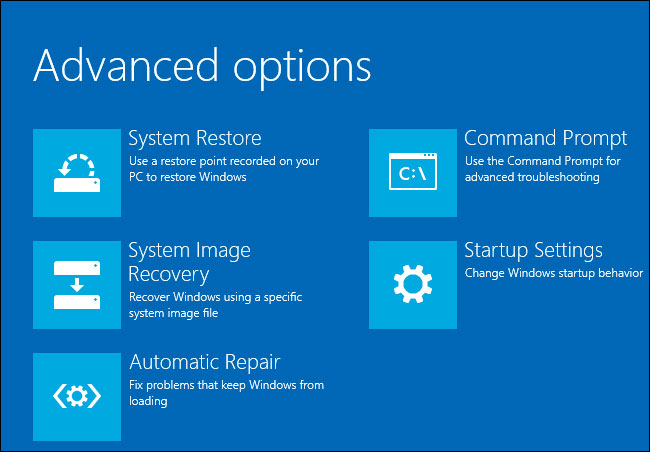
After the computer restarts in the proposed menu, select Diagnostics / Advanced Options / System Image Recovery or System Restore (depending on the desired method of recovery).
Continue the recovery process following the instructions of the wizard and clicking the Next button. The program will automatically carry out the further work.
Wait for the end of the process and restart the computer.
System recovery from an image if Windows does not boot
Set in the BIOS or UEFI booting of the operating system from CD, DVD or USB drive (depending on the bootable media).
Insert it into the drive (or connect to USB-port) the drive with the system image.
Restart your computer.
In the proposed menu, select Diagnostics / Computer Restore. The program will carry out the further work automatically.
Wait until the end of the process and restart the computer.
Restoring Factory Settings of Packard Bell Laptop
To restore the system laptop applies the same methods as for the desktop computer. A further option to restore on a Packard Bell Laptop is the possibility to return to the factory settings with the help of a hidden Recovery partition, which is pre-installed by the manufacturer.
Note. When restoring the Laptop factory settings: all user data from the Laptop system partition will be deleted; the system partition of Laptop will be formatted; all the software and apps pre-installed by the manufacturer will be installed.
To restore the Laptop factory settings:
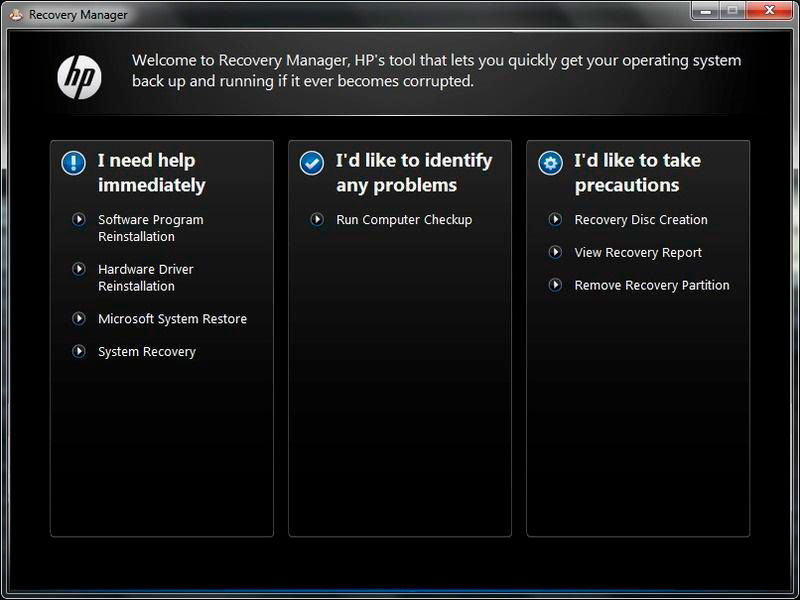
Start the Laptop factory settings restore program (system reset).
Select from the menu the function of System Restore (or factory settings) and follow all the system instructions.
Wait until the end of the process and restart the computer.
Note. In various Laptops this occurs differently. For some manufacturers this utility is started by pressing one or a combination of keys while switching the Laptop on while others carry out the process using their own software (typically pre-installed).
Laptop Restoring Using a Hidden Recovery Partition
A Starting from Windows 7 when you install the operating system on your computer in addition to the main (working) partitions the hidden (system) are also created. These partitions are not visible in Windows Explorer, they are only available in the Disk Manager. Name of the partitions:
System Reserved (Reserved by the system);
Untitled (Recovery Partition).
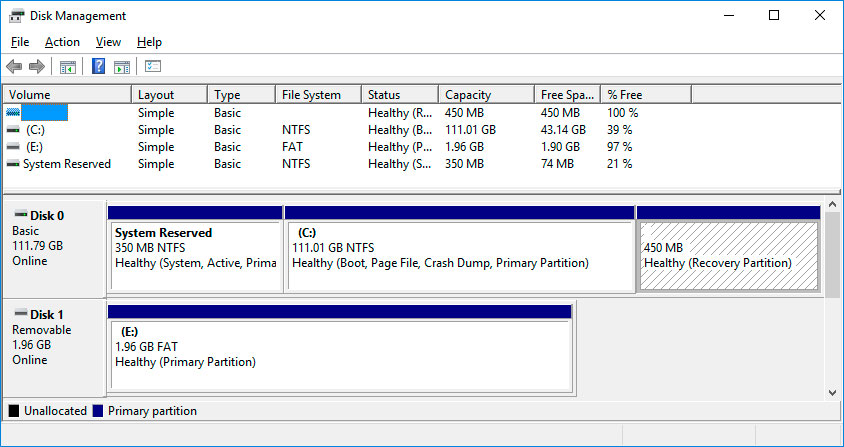
In the System Reserved partition the files of boot configuration data (BCD) and boot manager (bootmgr) are stored. Thus, the system protects the boot files from being overwritten, and also with the help of this partition log on into the system recovery environment is carried out.
Also in Laptop the pre-installed by the manufacturer hidden Laptop partition recovery is present. With the help of this partition the Laptop restore to the factory settings is carried out.

How to Reset Windows 10 or 8 PC to Factory Default Settings (All Methods)

How to Reset Windows 10 or 8 PC If The Operating System Won't Boot
Restoring Laptop Password
Do you need to restore your Laptop password?
Retrieve forgotten user password with Windows tools
Note. Before restoring access to the user account, check the prompt, which is located on the Welcome screen beside the password entry field.
If the prompt did not help:
Log on to the computer using the Administrator account.
-
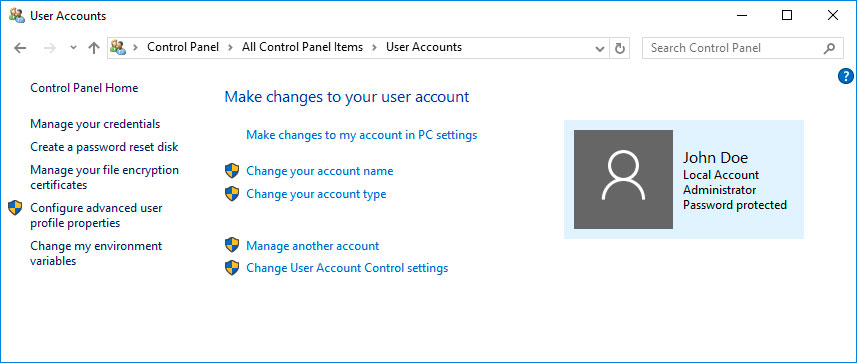
Go to Control Panel / User Accounts.
-
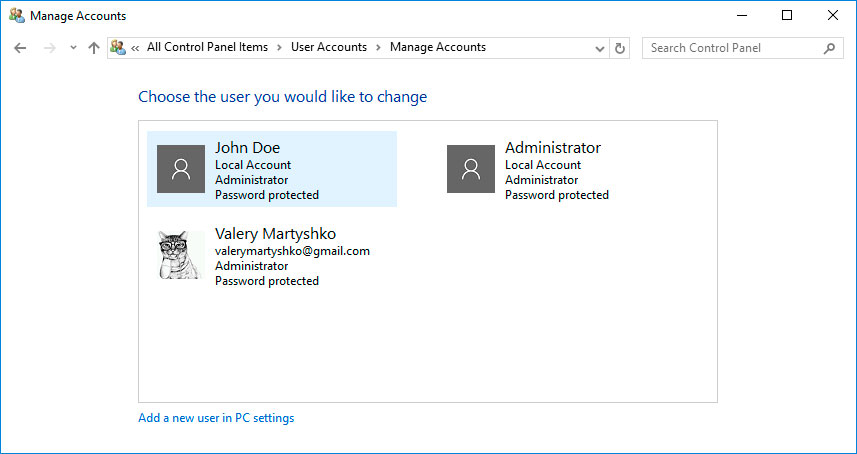
Click Manage another account.
-
Select the desired account.
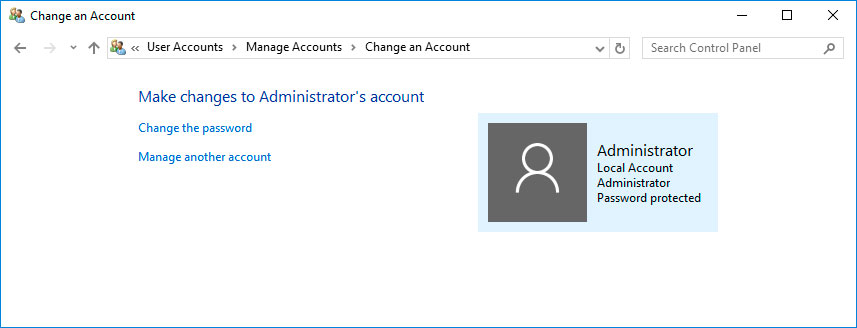
- Select Change Password.
-
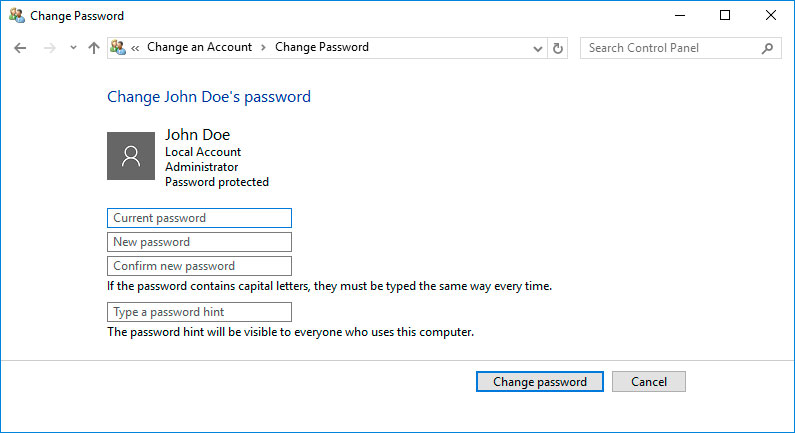
Enter a new password and click Change Password key.
-
Exit the Administrator account and log in to your account using your new password.
Restore the password of built-in Administrator account
If access to the local Administrator account is lost, it must be received in the first place. For this:
Boot Windows by means of an installation disc c.
Select «System Restore» in the first window with the «Install» key.
-
Select Diagnostics / Advanced Options / Command Prompt in the next window.
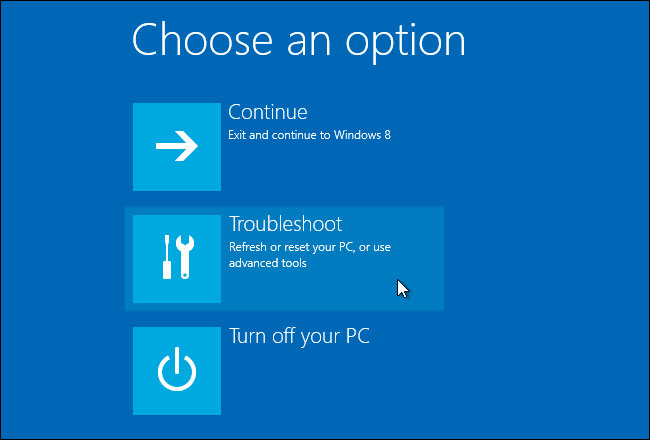
Click on the menu item Command Prompt.
-
Type in the opened Command Prompt window:
move с:windowssystem32utilman.exe с:windowssystem32utilman.bak;
copy с:windowssystem32cmd.exe с:windowssystem32utilman.exe.
Where «c:» is the drive on which Windows folder is located.
Note.These commands allow you to open Command prompt window on the login screen, with the help of Special Features key or by using the keyboard shortcut Win + U.
Remove the installation CD from the computer.
Stop the operating system installation and restart the computer.
In the password entry field, run Command prompt by selecting Special Features menu or by pressing the keyboard shortcut Win + U.
If the password entry field does not show administrator account, you must activate it. To do this, use the following command: net user Administrator / active: yes, and then restart the computer.
-
Type net user command to display all computer users.
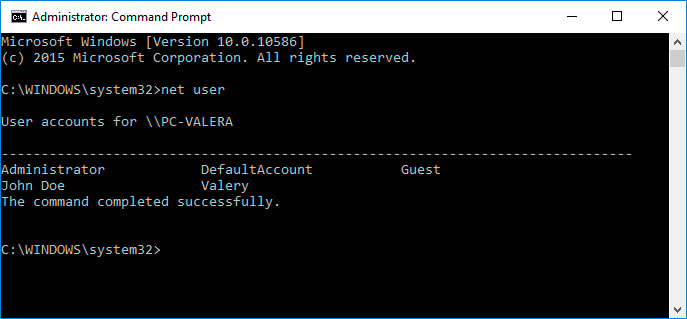
Enter the command net user name password. Where name is the user name into password - a new password. That is, to reset the administrator password and set a new password (for example - qwerty), in this case you must enter the command: net user Administrator qwerty.
Restart your computer and enter the administrator account using the new password. After the login to Windows administrator account is made, the password can be changed at any time using Windows tools.
Reflashing and BIOS Recovery
In order to recovery operability of Laptop BIOS, download the BIOS reflashing for your Laptop model. Reflashes can be found on the Laptop or motherboard manufacturer site. You can reflash BIOS from DOS or Windows.
Note. Sometimes for the successful implementation of the reflashing you need to change the name of the reflashing file to the value set by the manufacture.
BIOS in DOS reflashing
Download the BIOS reflashing for your laptop model, unpack it with any archive and save it on a USB flash drive.
Insert this USB flash drive in the Laptop.
-
Turn on the Laptop with the help of one of the shortcut keys (each Laptop model provides its own shortcut, please read the instructions for your Laptop model). Here are some options: Win + Esc; Fn + Esc; Win + B; Fn + B; Win + M; Fn + M; Win + F; Fn + F.
Then, without releasing the key, press the Laptop power button.
Wait for BIOS recovery process finish.
BIOS in Windows reflashing
Disable any programs that are running on a Laptop.
Disconnect all network connections and the Internet.
Charge the battery or connect to the mains supply.
Disconnect all the devices connected to the Laptop (except the mouse).
Start the reflashing file with the .bat extension (sometimes .exe).
Wait for the BIOS reflashing process and reboot the computer.
Models Laptop Packard Bell:
Pre 286 Machines
- PB-500 (8088);
- PB-8810 (8088);
- 486;
- 486 CD/33;
- 486 CD/50;
- 486 SX-33 H2;
- 486 DX2-66 HW;
Axcel
- Axcel 251CD Plus;
- Axcel 1103 SL;
- Axcel 1707D;
- Axcel 1728 D;
- Axcel 1602D;
Executive
- Executive 8707 D;
- Executive 403;
- Executive 405;
- Executive 560;
- Executive 590T;
Force
- Force 107;
- Force 820 FE;
- Force 2738 D/4;
- Force 2742 T/4;
- Force 486SX* (True model name unknown);
- Force 50CD;
- Force 443CD;
- Force 482CDT;
- Force 860CD;
- Force 872CDT;
- Force 1998CDT;
- Force 1999CDT;
- Force 4650;
Legend
- Legend 2000 Multi-Media*;
- Legend 2CD;
- Legend 230*;
- Legend 233;
- Legend 233 Plus;
- Legend 610;
- Legend 10CD;
- Legend 12CD;
- Legend 18CD*;
- Legend 20CD*;
- Legend 100CD;
- Legend 110CDT;
- Legend 105CD;
- Legend 201CD;
- Legend 204CD;
- Legend 300CD;
- Legend 322CDT;
- Legend 401CD;
- Legend 402CD*;
- Legend 403CD;
- Legend 406CD*;
- Legend 408CD;
- Legend 409CDT;
- Legend 410CD;
- Legend 418CD;
- Legend 423CDT;
- Legend 430H*;
- Legend 436CDT;
- Legend 600X;
- Legend 747MT;
- Legend 812CD;
- Legend 814CD*;
- Legend 818CDT*;
- Legend 822CDT*;
- Legend 823CDT;
- Legend 824CDT;
- Legend 994CDT;
- Legend 1824CDT;
- Legend 1990CDT;
- Legend 833DX;
- Legend 2051;
- Legend 2052*;
- Legend 3304S;
- Legend 2440;
- Legend 3540*;
- Legend 3550*;
- Legend 4610;
- Legend 4670;
- Legend 5000;
- Legend 5385z;
- Legend Elite;
- Legend Elite 4705 D;
- Legend x Supreme;
- Legend 117 Supreme*;
- Legend 760 Supreme*;
- Legend 790 Supreme;
- Legend 60CD Supreme;
- Legend 70CD Supreme*;
- Legend 106CDT Supreme;
- Legend 108CDT Supreme;
- Legend 130CD Supreme*;
- Legend 1510 Supreme*;
- Legend 1520 Supreme;
Legend Supreme;
- Legend Supreme 1125;
- Legend Supreme 1600;
- Legend Supreme 1605;
- Legend Supreme 1610;
- Legend Supreme 1611 NS;
- Legend Supreme 1612;
- Legend Supreme 1620;
- Legend Supreme 1700;
- Legend Supreme 1710;
- Legend Supreme 1730;
- Legend Supreme 1810*;
- Legend Supreme 1905;
Multi-Media
- Legend 2000 Multi-Media);
Multimedia
- Multimedia 70106D;
- Multimedia 70157C;
- Multimedia 70159D;
- Multimedia Corner 90 (C90);
- Multimedia 550;
- Multimedia 730;
- Multimedia 820*;
- Multimedia C75;
- Multimedia C110;
- Multimedia C111;
- Multimedia C115;
- Multimedia C115A;
- Multimedia D130;
- Multimedia D131;
- Multimedia D135*;
- Multimedia D136;
- Multimedia D141 NS;
- Multimedia D142 NS;
- Multimedia D160;
- Multimedia E140;
- Multimedia E152;
- Multimedia E153;
- Multimedia E154;
- Multimedia E155;
- Multimedia E156;
- Multimedia E158;
- Multimedia F170*;
- Multimedia F173;
- Multimedia F175;
- Multimedia F177;
- Multimedia J178;
- Multimedia J179;
- Multimedia J180 NS;
- Multimedia J185 NS;
- Multimedia L190*;
- Multimedia L191;
- Multimedia L192 NS;
- Multimedia L195;
- Multimedia L197;
- Multimedia L197+;
- Multimedia L198;
- Multimedia L199;
- Multimedia M400;
- Multimedia M402;
- Multimedia M403;
- Multimedia M404;
- Multimedia M415*;
- Multimedia R500;
- Multimedia R501*;
- Multimedia R504;
- Multimedia R506;
- Multimedia R507;
- Multimedia R510;
- Multimedia R515*;
- Multimedia S600;
- Multimedia S605;
- Multimedia S606*;
- Multimedia S610;
- Multimedia S615;
- Multimedia S616;
- Multimedia S618;
- Multimedia S620;
- Multimedia V134*;
Other Models
- The Microsoft Station;
PB
- PB 23;
- PB 486 CD;
- PB 610;
- PB 1666CD;
- PB 1750CDT*;
- PB 2951;
- PB 2900;
- PB 2990*;
- PB 4240*;
- PB 5330*;
- PB 7201S;
- PB 7705 D;
- PB (Laptop);
- PB286LP;
- PB286LP/40;
Pack-Mate
- Pack-Mate II (286);
- Pack-Mate 1950;
- Pack-Mate 3000CD;
- Pack-Mate 3980CD;
- Pack-Mate 3987CD*;
- Pack-Mate 4990CD;
- Pack-Mate 6419CD;
- Pack-Mate 6540CD;
- Pack-Mate PMX220;
- Pack-Mate 7130;
- Pack-Mate 7135;
- Pack-Mate 7240;
- Pack-Mate 7415;
- Pack-Mate 7416;
- Pack-Mate 7530;
- Pack-Mate 7540;
- Pack-Mate 7580;
- Pack-Mate 7590;
- Pack-Mate 7600;
- Pack-Mate 7660;
- Pack-Mate 7661;
- Pack-Mate 7670;
- Pack-Mate 7680;
- Pack-Mate 7715EX;
- Pack-Mate 7725;
- Pack-Mate 7745;
- Pack-Mate 7745+;
- Pack-Mate 7746;
- Pack-Mate 7755;
- Pack-Mate 7820 NS;
- Pack-Mate 7835;
- Pack-Mate 7900;
Platinum
- Platinum I*;
- Platinum III;
- Platinum X;
- Platinum XI;
- Platinum XXI;
- Platinum 40*;
- Platinum 55*;
- Platinum 60;
- Platinum 61;
- Platinum 65;
- Platinum 70;
- Platinum 2010;
- Platinum 2010X;
- Platinum 2015;
- Platinum 2015X NS;
- Platinum 2016;
- Platinum 2018;
- Platinum 2019;
- Platinum 2220;
- Platinum 2240*;
- Platinum 2250X NS;
- Platinum 2260;
- Platinum 2280;
- Platinum 3000;
- Platinum 3100;
- Platinum 4000;
- Platinum 4400;
- Platinum 5100;
Platinum Supreme
- Platinum Supreme 1660;
- Platinum Supreme 1665*;
- Platinum Supreme 1670;
- Platinum Supreme 1680;
- Platinum Supreme 1740;
- Platinum Supreme 1850;
- Platinum Supreme 1890;
Platinum Pro
- Platinum Pro 650;
- Platinum Pro 750;
- Platinum Pro 755;
Pro
- Pro 66TV Multimedia Computer (Another rare black model);
- Pro Supreme;
- Pro 65CD Supreme (Rare Black model);
Statesman
- Statesman 810410;
- Statesman Plus 810415;
Spectria
- Spectria 610 AN;
- Spectria 9012*;
EasyNote
- EasyNote 3612c;
- EasyNote 4012c;


