RAID Disk File Access Without Active NAS Uniview DE3160-V2S: Practical Steps

When the ⭐ NAS is not working, access RAID disk files by connecting them to a PC, configuring RAID, and using recovery software for data recovery.

RAID Disk File Access Without Active NAS Uniview DE3160-V2S: Practical Steps

Uniview DE3160-V2S NAS Data Recovery in 2024

In this step-by-step tutorial, we’ll show you how to rebuild your RAID and recover data from DE3160-V2S.

RAID Disk File Access Without Active NAS Uniview DE3160-V2S: Practical Steps

RAID Recovery™ 2.6
Recover data from damaged RAID arrays inaccessible from a computer.
Download

Why can’t ordinary software tools restore files from RAID?

Conventional hard disks keep user’s data by writing it to their surface in a consecutive way, and this is how an entire file is stored on a single hard disk. However, when data is written to a RAID system, a file is divided into several parts. Then these parts are written consecutively to all hard disks within such array. The size of such parts may range from 2 KB to 2 MB, so each file is stored on several hard disks at the same time.

Such approach helps to speed up read and write operations, and it is evident that saving two parts of a file having the size of 1 GB to two hard disks simultaneously is much faster than saving the same 1 GB of data to one hard disk. However, this peculiarity makes file recovery more complicated.

Various RAID levels store information in different ways. Additionally, manufacturers like Uniview also introduce some modifications to this process, and that is why data can be written to hard disk in a wide variety of ways.

Are there any recommended best practices for securely storing usernames and passwords on NAS Uniview DE3160-V2@S devices?

Yes, there are several recommended best practices for securely storing usernames and passwords on NAS Uniview DE3160-V2@S devices:

  1. Use strong and unique passwords: Ensure that you use strong passwords that are difficult to guess. Avoid using common passwords or easily guessable information such as your name, birthdate, or sequential numbers. It is also important to use unique passwords for each device or account.
  2. Enable multi-factor authentication (MFA): Implementing MFA adds an extra layer of security by requiring users to provide additional verification, such as a code sent to their mobile device, in addition to their username and password. This helps protect against unauthorized access even if the password is compromised.
  3. Regularly update firmware: Keep the firmware of your NAS device up to date with the latest security patches and updates. Manufacturers often release firmware updates to address vulnerabilities and enhance security.
  4. Restrict access: Only provide access to authorized individuals who need it. Create separate user accounts with limited privileges for different users or groups. Restrict administrative access to only those who require it and regularly review and revoke access for users who no longer need it.
  5. Use secure protocols: Ensure that you are using secure protocols, such as HTTPS, for accessing and managing the NAS device. This encrypts the communication between your device and the NAS, preventing eavesdropping and unauthorized access.
  6. Regularly backup data: Implement a regular backup strategy to ensure that your data is protected in case of any unforeseen events, such as hardware failure or ransomware attacks. Store backups in a secure location separate from the NAS device.
  7. Disable default accounts: Change the default usernames and passwords provided by the manufacturer. Default credentials are often well-known and can be easily exploited by attackers.
  8. Monitor and log activity: Enable logging and monitoring features on the NAS device to track and detect any suspicious activity. Regularly review logs to identify any unauthorized access attempts or unusual behavior.
  9. Educate users: Provide training and awareness programs to educate users about best practices for password security, phishing attacks, and other common security threats. Encourage users to report any suspicious activity or potential security incidents.

By implementing these best practices, you can enhance the security of your NAS Uniview DE3160-V2@S devices and protect your usernames and passwords from unauthorized access.

How to take hard disks out of the NAS and connect them to a PC?

Although NAS DE3160-V2S can be accessed over the network, you still need to take the hard disks out of the storage device and connect them to a Windows computer. Only in this case will the software be able to scan them properly. Here is what you should do:

  1. Turn off the storage and disconnect it from the power supply.

    WARNING! Before you start taking hard disks out of your NAS device, read the manual carefully. Incorrect actions may damage your network-attached storage and/or the hard disks within the RAID system.

  2. Take the hard disks out of the NAS one by one, carefully removing them from their slots. Remember that the disks are extremely vulnerable: hitting or dropping them may result in serious physical damage.

  3. Make sure to mark each hard disk in accordance with how they were installed inside the NAS.

  4. Remove the hard disks and connect them to the computer. In this video, we have explored what ports are used to connect hard disks, and what to do if there are not enough ports or connectors.

    Go to view
    How to Order Remote Data Recovery

    How to Order Remote Data Recovery

Restoring data with Hetman RAID Recovery

Hetman Raid Recovery

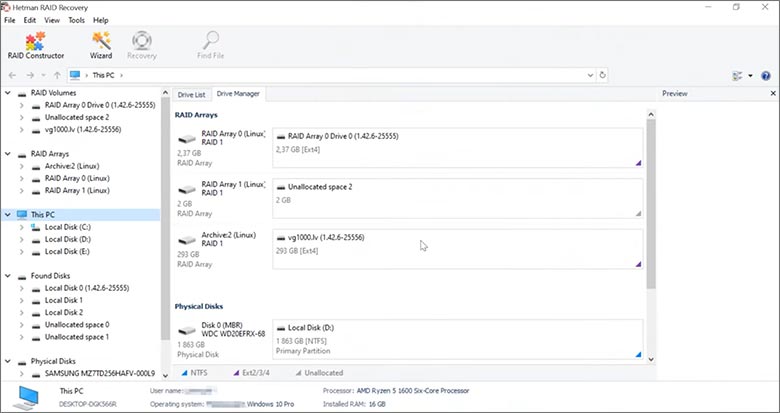
This program recovers data from damaged RAID arrays and is fully compatible with Uniview DE3160-V2S. The hard disks that make up the RAID contain technical information about the algorithm used to save files. When launched, Hetman RAID Recovery reads this information and puts the damaged array together. Then you can open the disk and save your files. Also, you can recover the files accidentally deleted from the network drive.

Go to view
How to recover data from a Uniview

How to recover data from a Uniview

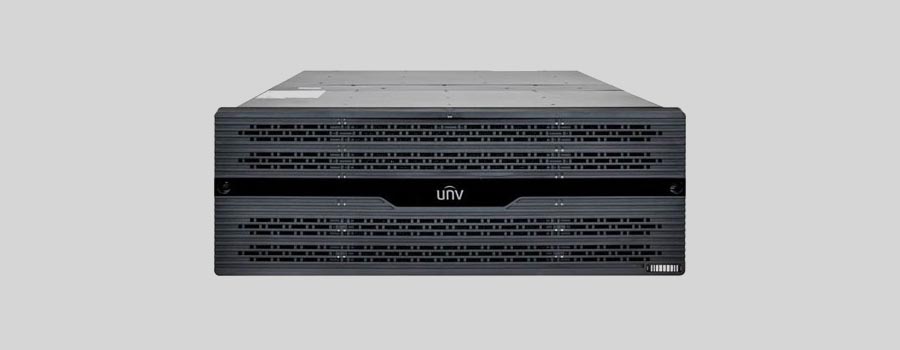
DE3160-V2S has 60 HDD slots, and it supports the following array types:

  • RAID 0;
  • RAID 1;
  • RAID 5;
  • RAID 6;
  • RAID 50;
  • RAID 60;
  • JBOD;

NAS supports:

  • exFAT, VFAT, FAT 12 / 16 / 32;
  • NTFS / ReFS;
  • APFS / HFS+;
  • Ext2 / 3 / 4 / ReiserFS / XFS / UFS / ZFS / Btrfs;
  • VMFS / HikvisionFS;

Safe recovery from disk images

This utility lets you save an entire copy of the disk to file and then work with this image instead of the actual disk. Such feature helps to protect data on the disk from:

  • Overwriting during the recovery process;
  • Loss resulting from bad sectors;
  • User mistakes.

To create an image, do the following:

  1. Make sure that you have enough free space to save the image. The image file size usually equals the disk size.

  2. Select the disk in the main window, and choose from the menu ToolsSave Disk. You can select multiple disks to be saved.

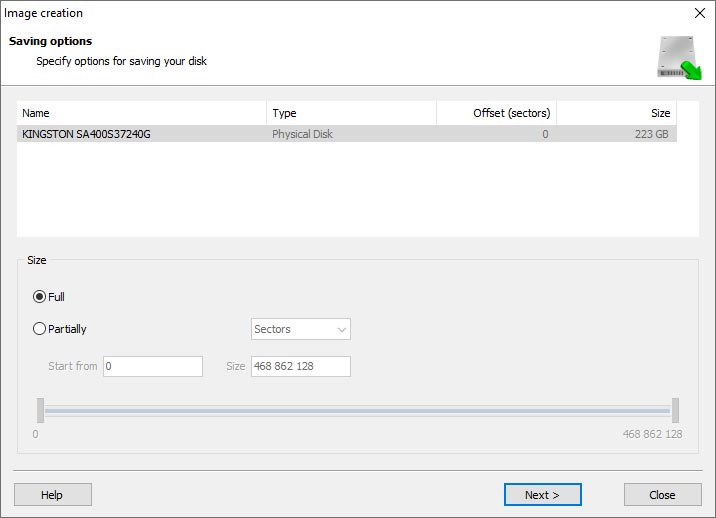
  3. When the image creation wizard starts, you can choose to save the entire disk or select only a part of it. Specify the parameters and click Next.

    Hetman Raid Recovery: Image Creation Wizard
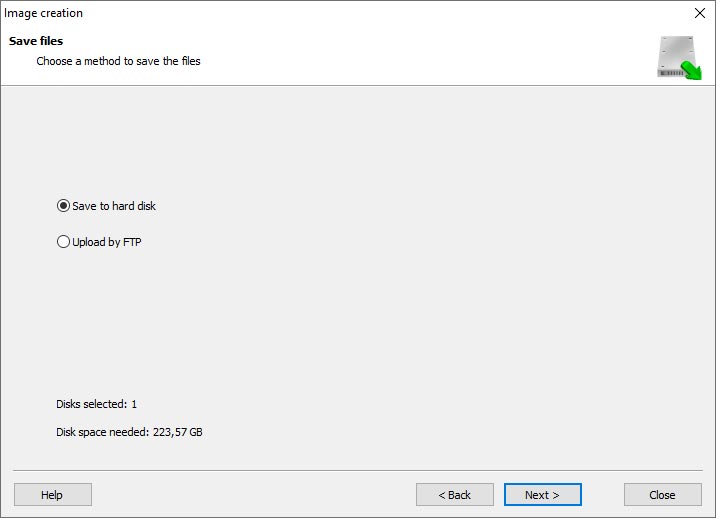
  4. At this stage, you need to choose a directory where to save the image. Choose any disk connected to this PC, or save the image by FTP.

    Hetman Raid Recovery: hoose any disk connected to this PC, or save the image by FTP

Where are user’s files stored?

The Uniview DE3160-V2S network-attached storage keeps OS Linux operating system files on a separate RAID 1 (mirrored) array. Usually, all NAS systems create several volumes on every hard disk, and the first of them takes up to 2 Gb of space. This is where operating system files are stored. Other volumes are united into a RAID array where user’s data is written.

Comparison of software for RAID recovery

Product Operating system License type RAID controller support Supported file systems Virtual RAID controller support Data recovery from damaged RAID File preview
Hetman RAID Recovery Windows Paid Yes, over 100 controllers FAT, NTFS, Ext2/3/4, HFS+ Yes Yes Yes
DiskInternals RAID Recovery Windows Paid Yes, over 100 controllers FAT, NTFS, Ext2/3/4, HFS+ No Yes Yes
R-Studio Windows, Mac, Linux Paid Yes, over 200 controllers FAT, NTFS, Ext2/3/4, HFS+ Yes Yes Yes
UFS Explorer RAID Recovery Windows, Mac, Linux Paid Yes, over 1,000 controllers FAT, NTFS, Ext2/3/4, HFS+ Yes Yes Yes
EaseUS Data Recovery Windows Paid Yes, over 20 controllers FAT, NTFS, Ext2/3/4, HFS+ No Yes Yes
ReclaiMe Free RAID Recovery Windows Free Yes, over 100 controllers FAT, NTFS, Ext2/3/4, HFS+ Yes Yes Yes

Feedback

We will be happy to answer your questions!

Comments (3)

  • Hetman Software: Data Recovery
    Hetman Software: Data Recovery 9.08.2022 12:31 #
    If you want to ask a question about data recovery, from NAS DE3160-V2@S, feel free to leave a comment!
  • Garth Lowson
    Garth Lowson 9.09.2023 14:53 #
    Is it possible to recover data from a NAS Uniview DE3160-V2S device that has been infected by malware or viruses?
    • Hetman Software
      Hetman Software 9.09.2023 16:00 #

      Yes, it is possible to recover data from a NAS (Network Attached Storage) device that has been infected by malware or viruses. However, the process can be complex and may require technical expertise. Here are some steps you can take:

      1. Disconnect the infected NAS device from the network to prevent further spread of the malware.
      2. Consult with a professional data recovery service that specializes in NAS devices. They will have the necessary tools and expertise to recover data from infected systems.
      3. Provide the data recovery service with as much information as possible about the malware or virus that infected the device. This will help them understand the nature of the infection and determine the best approach for recovery.
      4. Depending on the severity of the infection, the data recovery service may need to analyze the NAS device, remove the malware, and repair any damage before attempting to recover the data.
      5. Once the device is cleaned and repaired, the data recovery service will use specialized techniques to extract the data from the NAS device.
      6. It is important to note that the success of data recovery depends on various factors, such as the extent of the infection and any damage caused by the malware. In some cases, it may not be possible to recover all the data.

      Remember to always maintain regular backups of your important data to minimize the impact of malware or virus infections.

Post comment
User
Leave a reply
Your email address will not be published. Required fields are marked *

Vladimir Artiukh

Author: Vladimir Artiukh, Technical Writer

Vladimir Artiukh is a technical writer for Hetman Software, as well as the voice and face of their English-speaking YouTube channel, Hetman Software: Data Recovery for Windows. He handles tutorials, how-tos, and detailed reviews on how the company’s tools work with all kinds of data storage devices.

Oleg Afonin

Editor: Oleg Afonin, Technical Writer

Oleg Afonin is an expert in mobile forensics, data recovery and computer systems. He often attends large data security conferences, and writes several blogs for such resources as xaker.ru, Elcomsoft and Habr. In addition to his online activities, Oleg’s articles are also published in professional magazines. Also, Oleg Afonin is the co-author of a well-known book, Mobile Forensics - Advanced Investigative Strategies.

Share

Questions and answers

  • What are the key features and capabilities of the NAS Uniview DE3160-V2@S that make it suitable for saving video files?

    The NAS Uniview DE3160-V2@S is specifically designed for saving video files and offers several key features and capabilities that make it suitable for this purpose. These include:

    1. High storage capacity: The NAS Uniview DE3160-V2@S is equipped with multiple hard drive bays that can accommodate up to 16 hard drives, allowing for a large storage capacity. This ensures that it can store a significant amount of video footage.
    2. RAID support: The NAS supports various RAID configurations, including RAID 0, 1, 5, 6, and 10. This enables data redundancy and improves data protection against drive failures. It ensures that even if one or multiple drives fail, the video files will still be accessible and intact.
    3. High-speed data transfer: The DE3160-V2@S supports high-speed data transfer protocols such as Gigabit Ethernet and 10GbE, ensuring fast and efficient transfer of video files to and from the NAS. This is crucial for handling large video files and maintaining smooth video streaming.
    4. Scalability: The NAS is designed to be highly scalable, allowing for easy expansion of storage capacity as video storage requirements increase. Additional hard drives can be added to the available drive bays, providing flexibility and future-proofing the storage solution.
    5. Video management software integration: The DE3160-V2@S is compatible with various video management software (VMS) platforms, allowing for seamless integration and centralized management of video files. This simplifies the process of storing, organizing, and accessing video footage from multiple cameras.
    6. Data backup and synchronization: The NAS supports data backup and synchronization features, enabling automatic backups of video files to external storage devices or off-site locations. This ensures data redundancy and protects against data loss in case of hardware failures or disasters.
    7. Security features: The NAS offers advanced security features such as data encryption, access control, and IP filtering. These features help protect the stored video files from unauthorized access and ensure the integrity and confidentiality of the data.

    Overall, the NAS Uniview DE3160-V2@S provides a robust and reliable solution for saving video files. Its high storage capacity, RAID support, scalability, and integration with video management software make it suitable for various video surveillance applications, ensuring efficient and secure storage of video footage.

  • How does the NAS Uniview DE3160-V2@S ensure the security and reliability of the saved video files?

    The NAS Uniview DE3160-V2@S ensures the security and reliability of saved video files through several measures:

    1. RAID Configuration: The NAS supports RAID 0, 1, 5, 6, 10, and JBOD configurations, which provide data redundancy and protection against disk failures. This ensures that even if one or more disks fail, the video files remain intact and accessible.
    2. Data Encryption: The NAS supports AES 256-bit encryption, which ensures that the video files stored on the device are encrypted and protected from unauthorized access. This provides an additional layer of security to prevent data breaches.
    3. User Access Control: The NAS has a comprehensive user access control system, allowing administrators to set up different user accounts with varying levels of access permissions. This ensures that only authorized personnel can access and manage the video files, reducing the risk of unauthorized modifications or deletions.
    4. Network Security: The NAS supports various network security protocols, including SSL/TLS encryption, IP blocking, and firewall settings. These measures help protect the device from external threats, such as hacking attempts or unauthorized access from the internet.
    5. Automatic Backup: The NAS supports scheduled backups to external devices or remote servers. This ensures that even if the NAS itself experiences a failure, the video files can be recovered from the backup, minimizing the risk of data loss.
    6. Surveillance Station: The NAS comes with a built-in Surveillance Station software that provides advanced video management and monitoring capabilities. This software includes features like motion detection, alarm notifications, and video analytics, which enhance the security and reliability of the saved video files.

    Overall, the NAS Uniview DE3160-V2@S implements various security and reliability features to ensure the integrity and protection of the saved video files, making it suitable for surveillance and video storage applications.

  • Can you provide a step-by-step guide on how to set up and use the NAS Uniview DE3160-V2@S for saving video files?

    Setting up and using the NAS Uniview DE3160-V2@S for saving video files involves several steps. Here is a step-by-step guide to help you:

    1. Initial Setup:
      • Connect the NAS to your network using an Ethernet cable.
      • Power on the NAS by connecting it to a power source.
      • Wait for the NAS to boot up and initialize.
    2. Accessing the NAS:
      • Open a web browser on a computer connected to the same network as the NAS.
      • Enter the NAS's IP address in the browser's address bar and press Enter.
      • You will be prompted to enter the login credentials. Use the default username and password provided with the NAS.
    3. Configuring Storage:
      • Once logged in, navigate to the Storage or Storage Management section.
      • Create a storage pool by selecting the available disks and choosing the RAID configuration.
      • Create a volume within the storage pool and specify the size and file system format (e.g., ext4, NTFS).
      • Format the volume to make it usable.
    4. Creating Shared Folders:
      • Navigate to the Shared Folders or File Sharing section.
      • Create a new shared folder by specifying a name and selecting the volume where it should be located.
      • Configure access permissions for the shared folder, allowing read and write access as required.
    5. Configuring Network Services:
      • In the NAS settings, locate the Network Services or Services section.
      • Enable the necessary network services, such as SMB (Windows File Sharing) or NFS (Network File System), depending on your requirements.
    6. Mounting the NAS:
      • On your computer, open the File Explorer (Windows) or Finder (Mac).
      • In the address bar, enter the NAS's IP address or hostname in the following format: \NAS_IP_ADDRESS or smb://NAS_IP_ADDRESS.
      • Press Enter or click Go to access the NAS.
      • You should see the shared folders you created earlier.
    7. Saving Video Files:
      • Copy or move the video files you want to save to the appropriate shared folder on the NAS.
      • Wait for the file transfer to complete.
    8. Accessing Saved Video Files:
      • Whenever you need to access the saved video files, open the File Explorer (Windows) or Finder (Mac).
      • Enter the NAS's IP address or hostname in the address bar as mentioned in step 6.
      • Navigate to the shared folder where the video files are saved.
      • Double-click on the video files to open and play them using a compatible media player.

    Remember to consult the NAS Uniview DE3160-V2@S user manual for specific instructions and any additional features or settings that may be available.

Hello! This is AI-based Hetman Software virtual assistant, and it will answer any of your questions right away.
Start Chat